Lighting
The Lighting capabilities of Makie differ between backends and plot types. They are implemented for mesh related plot types (mesh, meshscatter, surface), their derivatives (e.g. 3D arrows), voxels and to some degree volume plots (and contour3d). With respect to Backends:
GLMakie implements the baseline lighting model and will act as our default for this page.
WGLMakie implements a simplified version of GLMakie's lighting.
CairoMakie implements limited lighting due to its limited 3D capabilities
RPRMakie implements parts of Makies lighting model but can also use more sophisticated methods from RadeonProRender.
Material Attributes
In 3D rendering a material describes how an object reacts to light. This can include the color of an object, how bright and sharp specular reflections are, how metallic it looks, how rough it is and more. In Makie however the model is still fairly simple and limited. Currently the following material attributes are available:
diffuse::Vec3f = Vec3f(1.0): controls how strong the diffuse reflections of an object are in the red, green and blue color channel. A diffuse reflection is one where incoming light is scattered in every direction. The strength of this reflection is based on the amount of light hitting the surface, which is proportional todot(light_direction, -normal). It generally makes up the main color of an object in light.specular::Vec3f = Vec3f(0.4): controls the strength of specular reflection in the red, green and blue color channels. A specular reflection is a direct reflection of light, i.e. one where the incoming angledot(light_direction, -normal)matches the outgoing angledot(camera_direction, -normal). It responsible for bright spots on objects. Note that this does not take the color of the object into account, as specular reflections typically match the light color.shininess::Float32 = 32f0: controls how sharp specular reflections are. Low shininess will allow a larger difference between incoming outgoing angle to take effect, creating a larger and smoother bright spot. High shininess will respectively reduce the size of the bright spot and increase its sharpness. This value must be positive.backlight::Real = 0controls how strongly light interacts with the backside of an object. Setting this to a value> 0can be helpful when visualizing a surface. (More precisely the light calculation is repeated with inverted normals and the result is mixed in withbacklightas a prefactor.)
Note
RPRMakie does not use these material attributes. Instead it relies on RadeonProRender's material system, which is passed through the material attribute. See the RPRMakie page for examples.
Lights
Lights are controlled by the (underlying) scene a plot belongs to. Each scene can have one ambient light and a number of of other lights. The lights can set at initialization using the lights scene keyword argument. After initialization a number of functions can be used to view and manipulate lights. For these the ambient light and the remaining lights are separated.
get_lights(scene)returns the current lights vector (without the ambient light)set_lights!(scene, lights)replaces the current lights with the given ones (excluding ambient)set_ambient_light!(scene, color)sets the color (and intensity) of the ambient lightset_light!(scene, n, light)replaces the n-th light in the light vector with the given oneset_light!(scene, n; fields...)updates a field of the n-the light in the light vectorpush_light!(scene, light)adds a light to the light vectorset_directional_light!(scene; [color, direction, camera_relative])adjusts the directional light of the scene if it is the only available light other than the ambient light. (I.e. the scene is in FastShading mode)
Note that in these functions an LScene or Axis3 can be used in place of scene as well.
Further note that having multiple lights, or lights other than ambient and directional lights requires GLMakie to be used with the correct lighting algorithm. The algorithm will be chosen based on the lights present when the scene gets displayed, i.e. when a window is opened. Thus you should set up your lights before displaying. You can also set the algorithm manually by passing shading = MultiLightShading/FastShading/NoShading as a scene keyword arguments, or by calling set_shading_algorithm!(scene, MultiLightShading/FastShading/NoShading) before displaying.
You can also disable or enable shading on the plot level by passing plot!(..., shading = true/false).
AmbientLight
The AmbientLight provides a base light level to the scene.
using GLMakie
fig = Figure(size = (600, 600))
ax11 = LScene(fig[1, 1], scenekw = (lights = [],))
ax12 = LScene(fig[1, 2], scenekw = (lights = [AmbientLight(RGBf(0, 0, 0))],))
ax21 = LScene(fig[2, 1], scenekw = (lights = [AmbientLight(RGBf(0.7, 0.7, 0.7))],))
ax22 = LScene(fig[2, 2])
set_lights!(ax22, []) # remove default DirectionalLight
set_ambient_light!(ax22, RGBf(0.8, 0.3, 0))
for ax in (ax11, ax12, ax21, ax22)
    mesh!(ax, Sphere(Point3f(0), 1f0), color = :white)
end
fig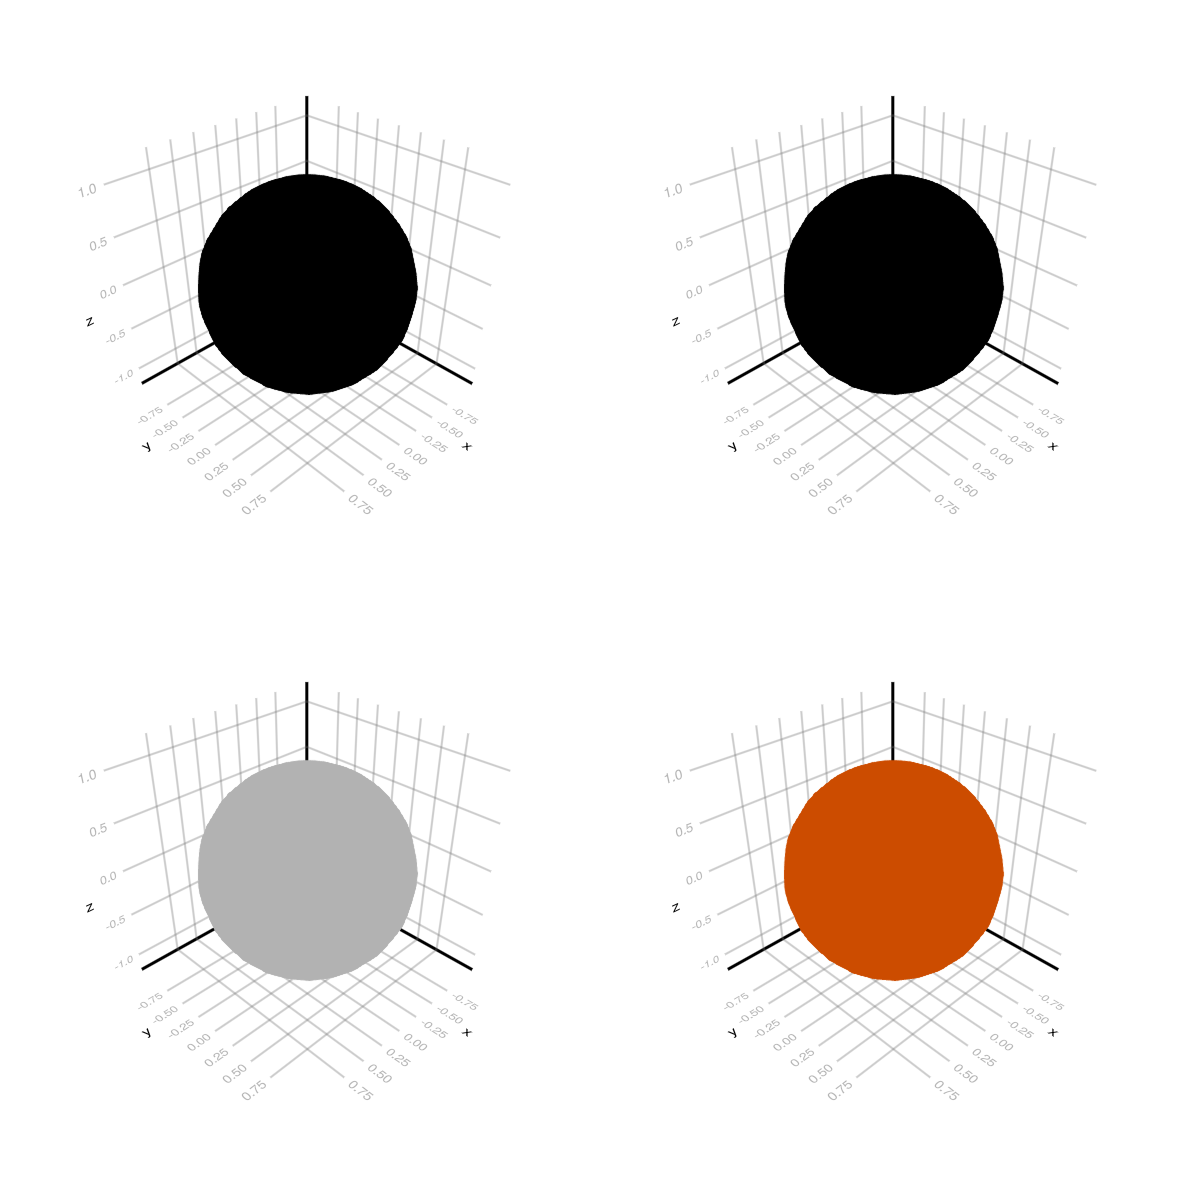
DirectionalLight
The DirectionalLight simulates a distant light source with parallel light ray. Depending on the angle between the light ray and the surface normal of the object, the shaded color differs.
using GLMakie
fig = Figure(size = (600, 600))
ax11 = LScene(fig[1, 1], scenekw = (lights = [DirectionalLight(RGBf(0, 0, 0), Vec3f(-1, 0, 0))],))
ax12 = LScene(fig[1, 2], scenekw = (lights = [DirectionalLight(RGBf(1, 1, 1), Vec3f(-1, 0, 0))],))
lights = [
    DirectionalLight(RGBf(0, 0, 0.7), Vec3f(-1, -1, 0)),
    DirectionalLight(RGBf(0.7, 0.2, 0), Vec3f(-1, 1, -1)),
    DirectionalLight(RGBf(0.7, 0.7, 0.7), Vec3f(1, -1, -1))
]
ax21 = LScene(fig[2, 1], scenekw = (lights = lights,))
ax22 = LScene(fig[2, 2])
set_ambient_light!(ax22, RGBf(0,0,0))
set_lights!(ax22, [DirectionalLight(RGBf(4, 2, 1), Vec3f(0, 0, -1))])
for ax in (ax11, ax12, ax21, ax22)
    mesh!(ax, Sphere(Point3f(0), 1f0), color = :white)
end
fig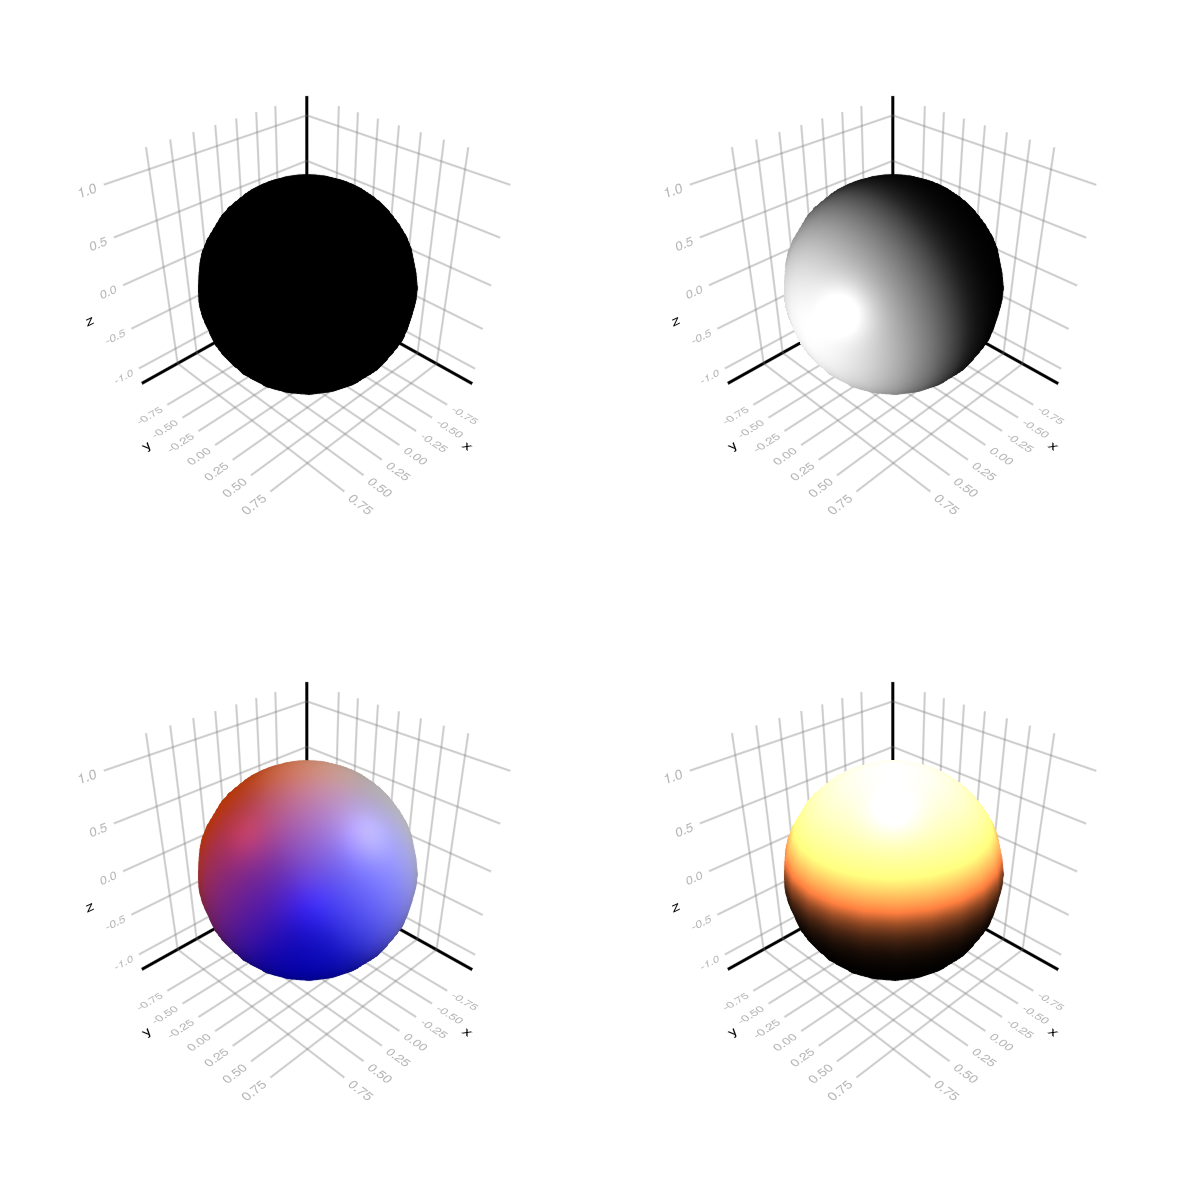
PointLight
A PointLight is a light source at some position, radiating outwards.
using GLMakie
fig = Figure(size = (600, 600))
ax = LScene(fig[1, 1], scenekw = (lights = [PointLight(RGBf(1, 1, 1), Point3f(0, 0, 0))],))
ps = [Point3f(x, y, z) for x in (-1, 0, 1) for y in (-1, 0, 1) for z in (-1, 0, 1)]
meshscatter!(ax, ps, color = :white)
fig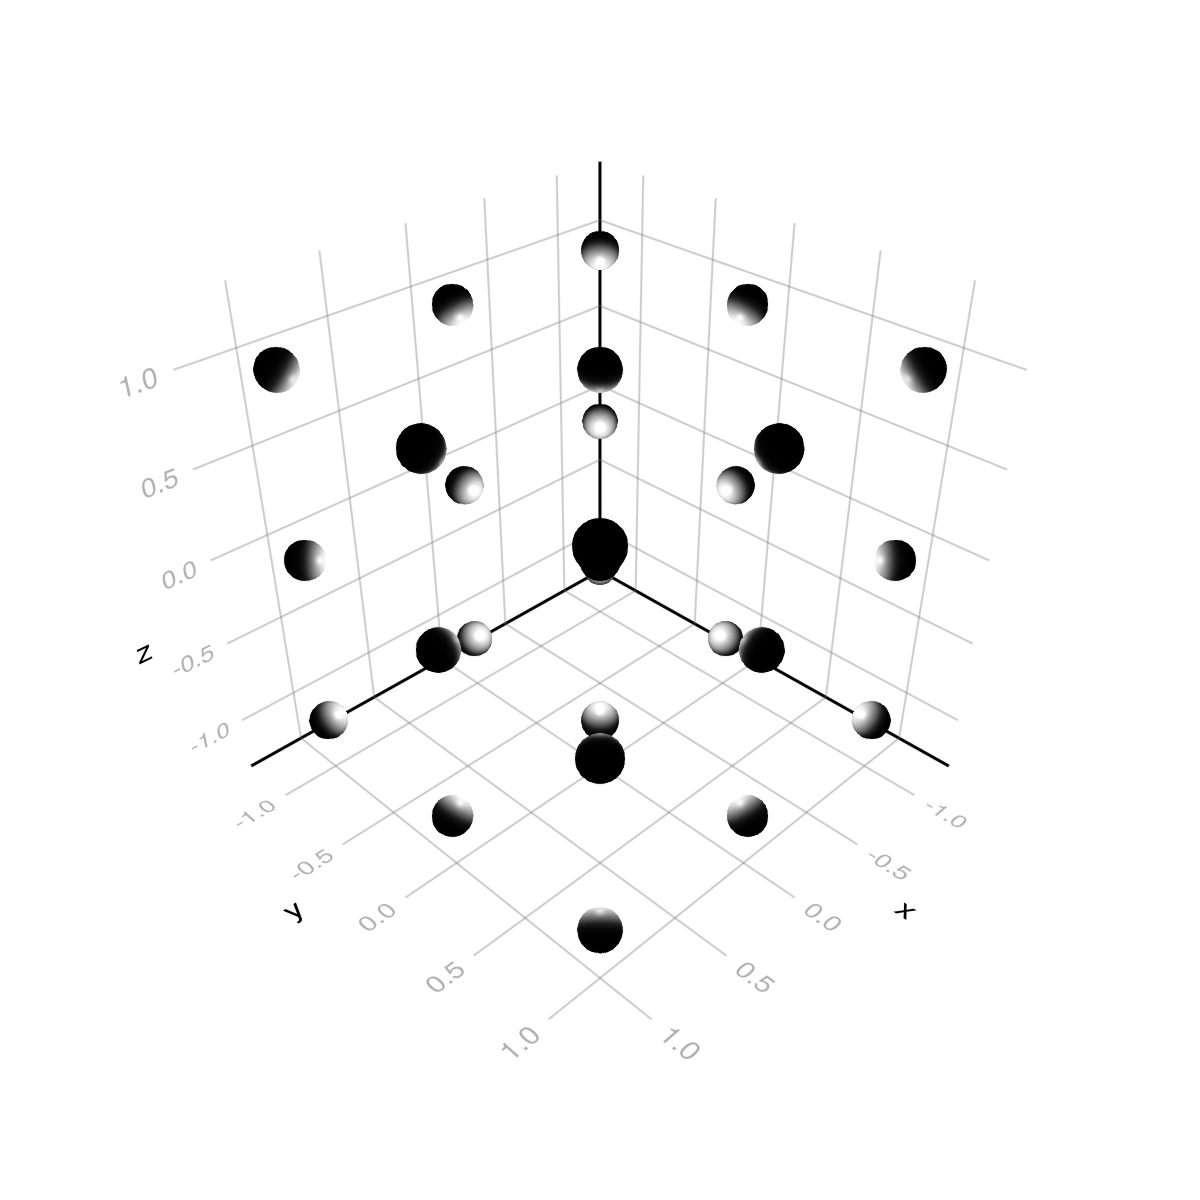
A PointLight can optionally include a distance measure or an attenuation::Vec2f which reduces its intensity based on the distance between the light source and the surface.
using GLMakie
fig = Figure(size = (600, 600))
ax = LScene(fig[1, 1])
set_ambient_light!(ax, RGBf(0,0,0))
set_lights!(ax, [])
push_light!(ax, PointLight(RGBf(1, 1, 1), Point3f(0, 0, 5), 50))
push_light!(ax, PointLight(RGBf(2, 0, 0), Point3f(-3, -3, 2), 10))
push_light!(ax, PointLight(RGBf(0, 2, 0), Point3f(-3,  3, 2), 10))
push_light!(ax, PointLight(RGBf(0, 0, 2), Point3f( 3,  3, 2), 10))
push_light!(ax, PointLight(RGBf(2, 2, 0), Point3f( 3, -3, 2), 10))

light_positions = map(l -> l.position, get_lights(ax))
light_colors = map(l -> l.color, get_lights(ax))

ps = [Point3f(x, y, 0) for x in -5:5 for y in -5:5]
meshscatter!(ax, ps, color = :white, markersize = 0.75)
scatter!(ax, light_positions, color = light_colors, strokewidth = 1, strokecolor = :black)
fig
With a strong intensity (light color) and attenuation you can create different colors at different distances.
using GLMakie
using GeometryBasics

ps = [
    Point3f(cosd(phi) * cosd(theta), sind(phi) * cosd(theta), sind(theta))
    for theta in range(-20, 20, length = 21) for phi in range(60, 340, length=30)
]
faces = [QuadFace(30j + i, 30j + mod1(i+1, 30), 30*(j+1) + mod1(i+1, 30), 30*(j+1) + i) for j in 0:19 for i in 1:29]
marker_mesh = GeometryBasics.mesh(ps, faces, normal = ps)

lights = [PointLight(RGBf(10, 4, 2), Point3f(0, 0, 0), 5)]

fig = Figure(size = (600, 600), backgroundcolor = :black)
ax = LScene(fig[1, 1], scenekw = (lights = lights,), show_axis = false)
update_cam!(ax.scene, ax.scene.camera_controls, Rect3f(Point3f(-2), Vec3f(4)))
meshscatter!(
    ax, [Point3f(0) for _ in 1:14], marker = marker_mesh, markersize = 0.1:0.2:3.0,
    color = :white, backlight = 1, transparency = false)
fig
SpotLight
A SpotLight is a light source at a specific position which illumated objects within a light cone. The cone is defined by a direction marking it's center and two angles marking where the light intensity starts and stops dropping off.
using GLMakie

lights = [
    SpotLight(RGBf(1, 0, 0), Point3f(-3, 0, 3), Vec3f(0,  0, -1), Vec2f(0.0, 0.3pi)),
    SpotLight(RGBf(0, 1, 0), Point3f( 0, 3, 3), Vec3f(0, -0.5, -1), Vec2f(0.2pi, 0.25pi)),
    SpotLight(RGBf(0, 0, 1), Point3f( 3, 0, 3), Vec3f(0,  0, -1), Vec2f(0.25pi, 0.25pi)),
]

fig = Figure(size = (600, 600))
ax = LScene(fig[1, 1], scenekw = (lights = lights,))
ps = [Point3f(x, y, 0) for x in -5:5 for y in -5:5]
meshscatter!(ax, ps, color = :white, markersize = 0.75)
scatter!(ax, map(l -> l.position, lights), color = map(l -> l.color, lights), strokewidth = 1, strokecolor = :black)
fig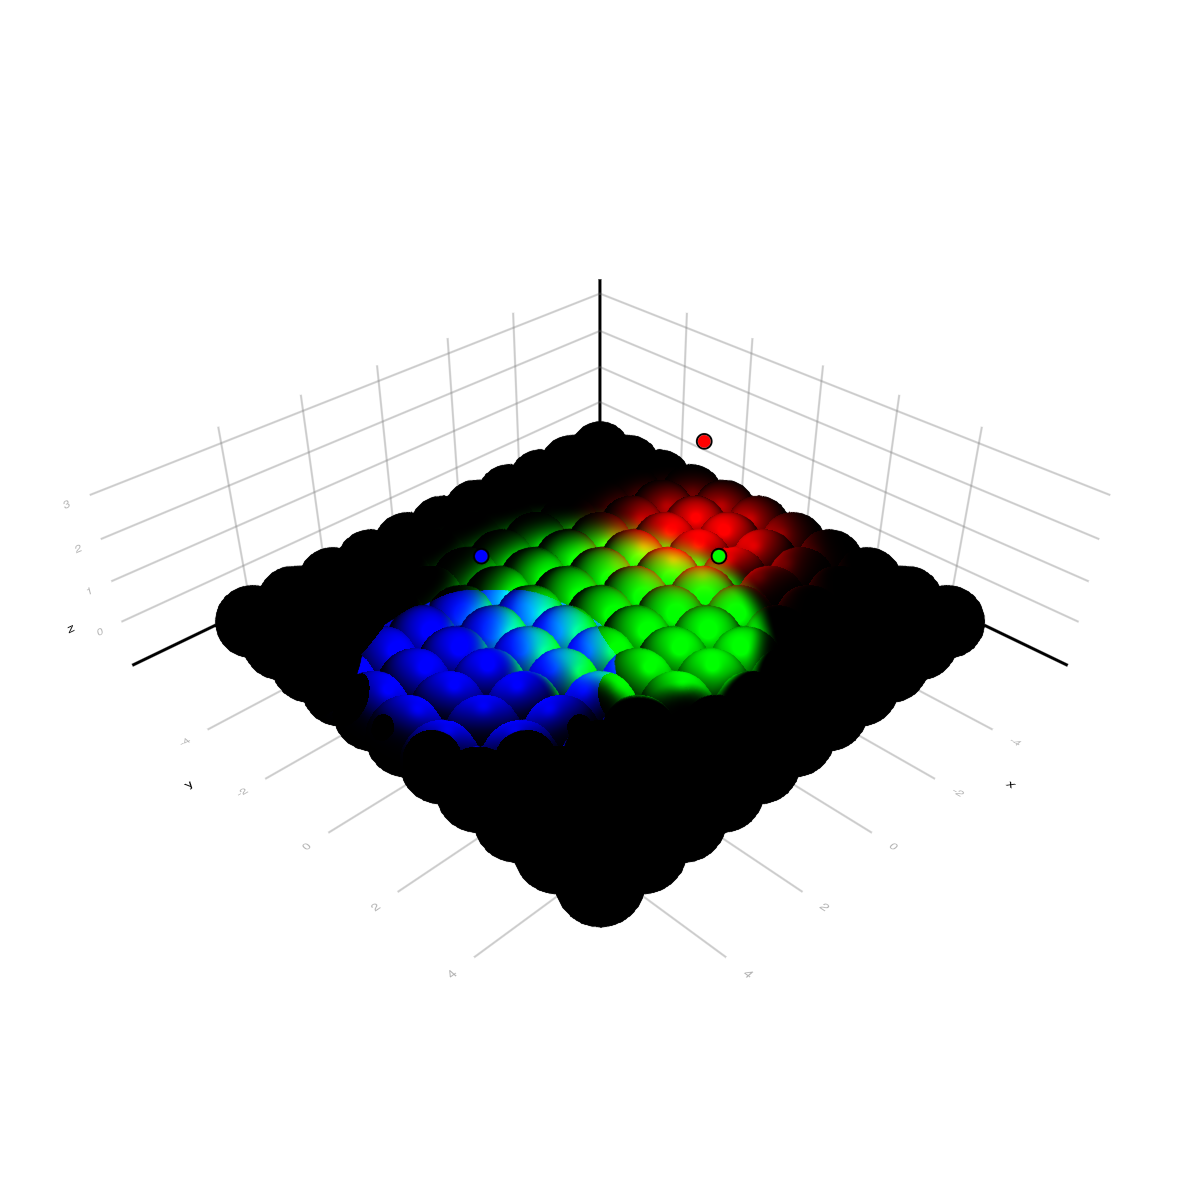
RectLight
A RectLight is light source that illuminates a rectangular column. It is defined by a position, a directional vector and two vectors defining the rectangle.
using GLMakie
using FileIO, GeometryBasics, LinearAlgebra

# Create mesh from RectLight parameters
function to_mesh(l::RectLight)
    n = -normalize(cross(l.u1, l.u2))
    p = l.position - 0.5 * l.u1 - 0.5 * l.u2
    positions = [p, p + l.u1, p + l.u2, p + l.u1 + l.u2]
    faces = GLTriangleFace[(1,2,3), (2,3,4)]
    normals = [n,n,n,n]
    return GeometryBasics.Mesh(positions, faces, normal = normals)
end

fig = Figure(backgroundcolor = :black)

# Prepare lights
lights = Makie.AbstractLight[
    AmbientLight(RGBf(0.1, 0.1, 0.1)),
    RectLight(RGBf(0.9, 1, 0.8), Rect2f(-1.9, -1.9, 1.8, 1.8)),
    RectLight(RGBf(0.9, 1, 0.8), Rect2f(-1.9,  0.1, 1.8, 1.8)),
    RectLight(RGBf(0.9, 1, 0.8), Rect2f( 0.1,  0.1, 1.8, 1.8)),
    RectLight(RGBf(0.9, 1, 0.8), Rect2f( 0.1, -1.9, 1.8, 1.8)),
]

lights = map(lights) do l
    if l isa RectLight
        angle = pi/4
        p = l.position
        l = Makie.rotate(l, Vec3f(0, 1, 0), angle)

        p = 3 * Vec3f(1+sin(angle), 0, cos(angle)) +
            p[1] * normalize(l.u1) +
            p[2] * normalize(l.u2)
        l = Makie.translate(l, p)
    end
    return l
end

# Set scene
scene = LScene(
    fig[1, 1], show_axis = false,
    scenekw=(lights = lights, backgroundcolor = :black, center = false),
)

# floor
msh = mesh!(scene, Rect3f(Point3f(-10, -10, 0.01), Vec3f(20, 20, 0.02)), color = :white)
translate!(msh, 0, 0, -5)

# Cat
cat_mesh = FileIO.load(Makie.assetpath("cat.obj"))
cat_texture = FileIO.load(Makie.assetpath("diffusemap.png"))
p2 = mesh!(scene, cat_mesh, color = cat_texture)
Makie.rotate!(p2, Vec3f(1,0,0), pi/2)
translate!(p2, -2, 2, -5)
scale!(p2, Vec3f(4))

# Window/light source markers
for l in lights
    if l isa RectLight
        mesh!(to_mesh(l), color = :white, backlight = 1)
    end
end

# place camera
update_cam!(scene.scene, Vec3f(3, -10, 2), Vec3f(1, -2, 0), Vec3f(0, 0, 1))

fig
┌ Error: obj file contains references to .mtl files, but none could be found. Expected: ["cat.mtl"] in /home/runner/.julia/artifacts/ad4e594b35357bcfafa2ed97db3137382a3f09bb.
└ @ MeshIO ~/.julia/packages/MeshIO/jBkmz/src/io/obj.jl:157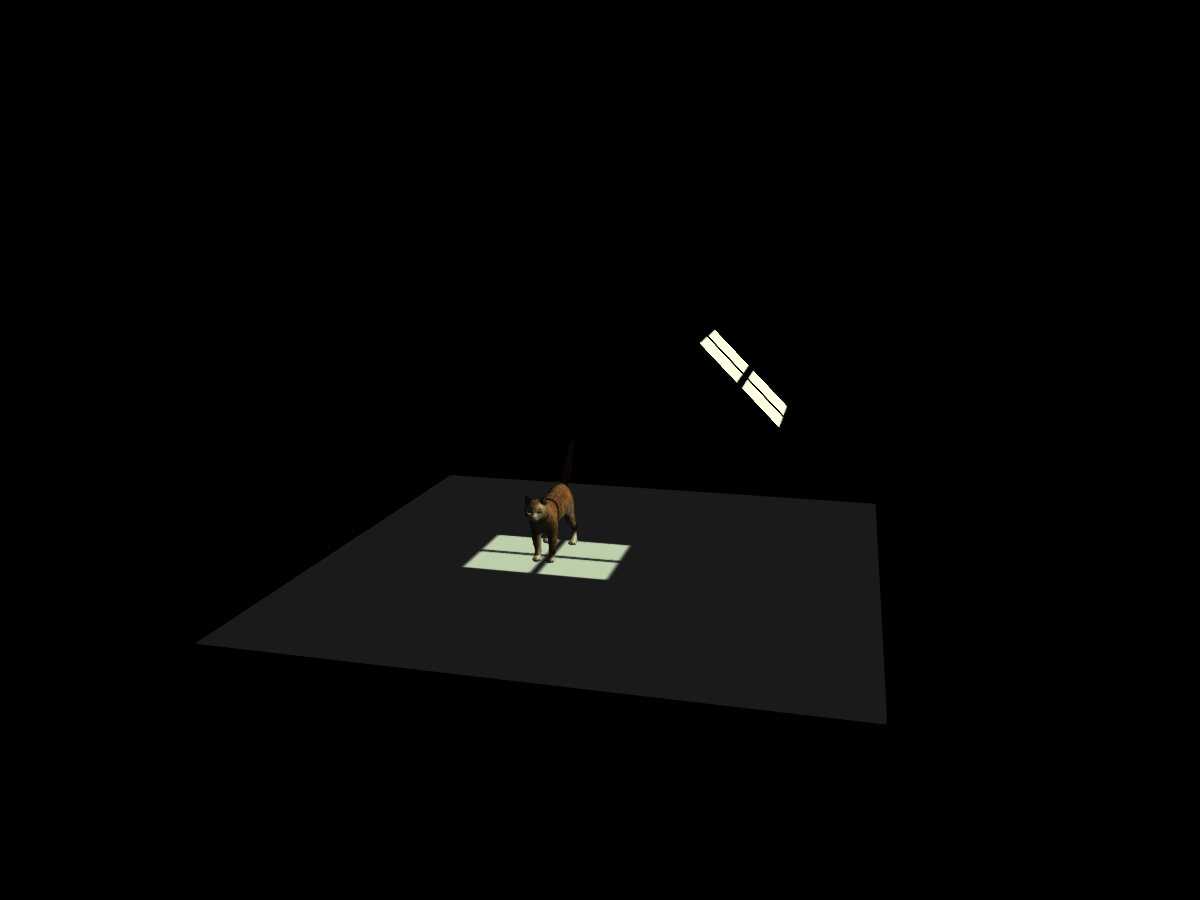
EnvironmentLight