
Cameras
Generally speaking, the camera controls the range of coordinates that are shown and from what perspective they are shown. For example, a 2D camera will give us a 2D perspective, meaning one where x extends right, y extends up and z extend towards the viewer. The range of x and y values shown on the screen is also controlled by the camera.
Overview
The term "camera" in Makie can be quite confusing as there are multiple things controlling, processing and storing camera related objects.
Before Blocks like Axis were introduced, scenes were the main building block users interacted with. Every Block still relies on them internally, and LScene specifically is just a light wrapper around Scene. Up until Makie 0.24 every scene contained two fields related to cameras - camera(scene) and cameracontrols(scene). The camera(scene)::Camera stores camera matrices like projectionview. Over time it has grown to also include eyeposition, view_direction and upvector, which describe the orientation and placement of the camera. The cameracontrols(scene) <: AbstractCamera are, as the name implies, an object that controls the camera. They generate the matrices stored in camera(scene) which means they are responsible for the range of visible coordinates and the perspective from which they are shown. They also process user input like mouse drags if that has an effect on the camera, and they may include settings.
Blocks have their own interaction system, which is also used to control the camera. This effectively replaces cameracontrols(scene). For example, if you check cameracontrols(ax.scene) for Axis and PolarAxis you will find an EmptyCamera. LScene still uses cameracontrols(scene) as it is just a wrapper around Scene.
Makie 0.24 brought in another layer with the scenes ComputeGraph in scene.compute. Currently the compute graph is fed by camera(scene) to (lazily) calculate all the projection matrices needed to resolve the space and markerspace attributes. It is effectively now the final output of the camera pipeline.
Camera Controls
The cameracontrols(scene) control how plot data is shown in Scene and LScene. They determine 2D vs 3D projections, the range of shown coordinates, the perspective and how these things react to user interaction.
Currently, we offer the following camera controllers/constructors
campixel!: A 2D camera using pixel coordinatescam_relative!: A 2D camera using relative (0..1) coordinatescam2d!: A 2D camera using dynamic coordinate rangesCamera3D: A general, highly adjustable 3D cameracam3d!: ACamera3Dwith default settingscam3d_cad!: ACamera3Dwith CAD-like settingsstage_cam!: AStageCamera, a 3D camera with photographic settings
To specify the camera controller you can set the camera attribute in a Scene.
Scene(..., camera = cam3d!)
LScene(..., scenekw = (camera = cam3d!, ))
You can replace and existing camera in a scene:
scene = Scene(...)
cam3d!(scene)

ax = LScene(...)
cam3d!(ax.scene)
Pixel Camera
The pixel camera (campixel!) projects the scene in pixel space, i.e. each integer step in the displayed data will correspond to one pixel. There are no controls for this camera. The z clipping limits are set to (-10_000, 10_000).
Relative Camera
The relative camera (cam_relative!) projects the scene into a 0..1 by 0..1 space. There are no controls for this camera. The z clipping limits are set to (-10_000, 10_000).
2D Camera
The 2D camera (cam2d!) uses an orthographic projection with a fixed rotation and aspect ratio. You can set the following attributes via keyword arguments in cam2d! or by accessing the camera struct cam = cameracontrols(scene):
zoomspeed = 0.10f0sets the speed of mouse wheel zooms.zoombutton = nothingsets an additional key that needs to be pressed in order to zoom. Defaults to no key.panbutton = Mouse.rightsets the mouse button that needs to be pressed to translate the view.selectionbutton = (Keyboard.space, Mouse.left)sets a set of buttons that need to be pressed to perform rectangle zooms.
The z clipping limits are set to (-10_000, 10_000).
Warning
This camera is not used by Axis. It is used, by default, for 2D LScenes and Scenes.
3D Camera
Camera3D is a generalized 3D camera with a large number of options. cam3d! and cam3d_cad! are specialized versions. The former is the default camera for 3D scenes. The latter is a camera that tries to mimic CAD-style cameras.
Makie.Camera3D Type
Camera3D(scene[; kwargs...])Sets up a 3D camera with mouse and keyboard controls.
The behavior of the camera can be adjusted via keyword arguments or the fields settings and controls.
Settings
Settings include anything that isn't a mouse or keyboard button.
projectiontype = Perspectivesets the type of the projection. Can beOrthographicorPerspective.rotation_center = :lookatsets the default center for camera rotations. Currently allows:lookator:eyeposition.fixed_axis = true: If true panning uses the (world/plot) z-axis instead of the camera up direction.zoom_shift_lookat = true: If true keeps the data under the cursor when zooming.cad = false: If true rotates the view aroundlookatwhen zooming off-center.clipping_mode = :adaptive: Controls hownearandfarget processed. Options::staticpassesnearandfaras is:adaptivescalesnearbynorm(eyeposition - lookat)and passesfaras is:view_relativescalesnearandfarbynorm(eyeposition - lookat):bbox_relativescalesnearandfarto the scene bounding box as passed to the camera withupdate_cam!(..., bbox). (More specificallyfar = 1is scaled to the furthest point of a bounding sphere andnearis generally overwritten to be the closest point.)
center = true: Controls whether the camera placement gets reset when callingcenter!(scene), which is called when a new plot is added.keyboard_rotationspeed = 1.0sets the speed of keyboard based rotations.keyboard_translationspeed = 0.5sets the speed of keyboard based translations.keyboard_zoomspeed = 1.0sets the speed of keyboard based zooms.mouse_rotationspeed = 1.0sets the speed of mouse rotations.mouse_translationspeed = 0.5sets the speed of mouse translations.mouse_zoomspeed = 1.0sets the speed of mouse zooming (mousewheel).circular_rotation = (false, false, false)enables circular rotations for (fixed x, fixed y, fixed z) rotation axis. (This means drawing a circle with your mouse around the center of the scene will result in a continuous rotation.)
Controls
Controls include any kind of hotkey setting.
up_key = Keyboard.rsets the key for translations towards the top of the screen.down_key = Keyboard.fsets the key for translations towards the bottom of the screen.left_key = Keyboard.asets the key for translations towards the left of the screen.right_key = Keyboard.dsets the key for translations towards the right of the screen.forward_key = Keyboard.wsets the key for translations into the screen.backward_key = Keyboard.ssets the key for translations out of the screen.zoom_in_key = Keyboard.usets the key for zooming into the scene (translate eyeposition towards lookat).zoom_out_key = Keyboard.osets the key for zooming out of the scene (translate eyeposition away from lookat).increase_fov_key = Keyboard.bsets the key for increasing the fov.decrease_fov_key = Keyboard.nsets the key for decreasing the fov.pan_left_key = Keyboard.jsets the key for rotations around the screens vertical axis.pan_right_key = Keyboard.lsets the key for rotations around the screens vertical axis.tilt_up_key = Keyboard.isets the key for rotations around the screens horizontal axis.tilt_down_key = Keyboard.ksets the key for rotations around the screens horizontal axis.roll_clockwise_key = Keyboard.esets the key for rotations of the screen.roll_counterclockwise_key = Keyboard.qsets the key for rotations of the screen.fix_x_key = Keyboard.xsets the key for fixing translations and rotations to the (world/plot) x-axis.fix_y_key = Keyboard.ysets the key for fixing translations and rotations to the (world/plot) y-axis.fix_z_key = Keyboard.zsets the key for fixing translations and rotations to the (world/plot) z-axis.reset = Keyboard.left_control & Mouse.leftsets the key for resetting the camera. This equivalent to callingcenter!(scene).reposition_button = Keyboard.left_alt & Mouse.leftsets the key for focusing the camera on a plot object.translation_button = Mouse.rightsets the mouse button for drag-translations. (up/down/left/right)scroll_mod = truesets an additional modifier button for scroll-based zoom. (true being neutral)rotation_button = Mouse.leftsets the mouse button for drag-rotations. (pan, tilt)
Other kwargs
Some keyword arguments are used to initialize fields. These include
eyeposition = Vec3d(3): The position of the camera.lookat = Vec3d(0): The point the camera is focused on.upvector = Vec3d(0, 0, 1): The world direction corresponding to the up direction of the screen.fov = 45.0is the field of view. This is irrelevant if the camera uses an orthographic projection.near = automaticsets the position of the near clip plane. Anything between the camera and the near clip plane is hidden. Must be greater 0. Usage depends onclipping_mode.far = automaticsets the position of the far clip plane. Anything further away than the far clip plane is hidden. Usage depends onclipping_mode. Defaults to1forclipping_mode = :bbox_relative,2for:view_relativeor a value derived from limits for:static.
Note that updating these observables in an active camera requires a call to update_cam(scene) for them to be applied. For updating eyeposition, lookat and/or upvector update_cam!(scene, eyeposition, lookat, upvector = Vec3d(0,0,1)) is preferred.
The camera position and orientation can also be adjusted via the functions
translate_cam!(scene, v)will translate the camera by the given vectorv.rotate_cam!(scene, angles)will rotate the camera around its axes with the corresponding angles. The first angle will rotate around the cameras "right" that is the screens horizontal axis, the second around the up vector/vertical axis orVec3d(0, 0, +-1)iffixed_axis = true, and the third will rotate around the view direction i.e. the axis out of the screen. The rotation respects the currentrotation_centerof the camera.zoom!(scene, zoom_step)will change the zoom level of the scene without translating or rotating the scene.zoom_stepapplies multiplicatively tocam.zoom_multwhich is used as a multiplier to the fov (perspective projection) or width and height (orthographic projection).
Warning
This camera is not used by Axis3. It is used, by default, for 3D LScenes and Scenes.
Stage Camera
The StageCamera (stage_cam!) is a 3D camera modelled on how a photographer works a scene, one decision at a time:
pick a subject and how much around it belongs in the shot:
lookatandstage_sizepick an angle:
azimuthandelevationpick a perspective, and with it how much background comes along:
mm(orfov)place the subject in the frame:
relative_offset
A photographer picks a distance and a focal length, and those two together produce the first and third item at once. This camera swaps the parameters around: you state the stage, a region of stage_size diameter around lookat that is guaranteed to stay in frame, and the distance is derived from it and the lens. So the third decision no longer disturbs the first.
The examples below all use the same scene, a cat standing in the Sponza atrium, and differ only in camera settings.
using GLMakie
using FileIO
using LinearAlgebra: normalize, cross # `using LinearAlgebra` would clash with Makie's `rotate!`

sponza = load(assetpath("sponza/sponza.obj"), uvtype = Vec2f)
sponza[:material_names][4] = "sp_01_stub_baza" # seems to be incorrect in the file
catmesh = load(assetpath("cat.obj"))
catcolor = load(assetpath("diffusemap.png"))

LOOKAT = Point3d(0.91, 0.12, 0.65) # the cat's eye
AZIMUTH, ELEVATION = -8.9, -5
PANEL = (width = 360, height = 280)

function atrium!(lscene)
    building = mesh!(lscene, sponza)
    rotate!(building, Vec3f(1, 0, 0), pi / 2) # the model is y-up, Makie is z-up

    cat = mesh!(lscene, catmesh, color = catcolor)
    rotate!(cat, qrotation(Vec3f(0, 0, 1), deg2rad(100)) * qrotation(Vec3f(1, 0, 0), pi / 2))
    translate!(cat, 0, 0, 0.1)
    return lscene
end

new_panel(gridpos) = atrium!(LScene(gridpos, show_axis = false, scenekw = (; camera = stage_cam!)))

function photo_panel(gridpos; kwargs...)
    lscene = new_panel(gridpos)
    stage_cam!(
        lscene.scene;
        lookat = LOOKAT, stage_size = 1.15, azimuth = AZIMUTH, elevation = ELEVATION, mm = 50,
        kwargs...
    )
    return lscene
end

fig = Figure(size = (PANEL.width * 2, PANEL.height * 2))
photo_panel(fig[1, 1])
fig
┌ Warning: obj file contains references to .mtl files, but none could be found. Expected: ["cat.mtl"] in /home/runner/.julia/artifacts/ad4e594b35357bcfafa2ed97db3137382a3f09bb.
└ @ MeshIO ~/.julia/packages/MeshIO/QrIjZ/src/io/obj.jl:166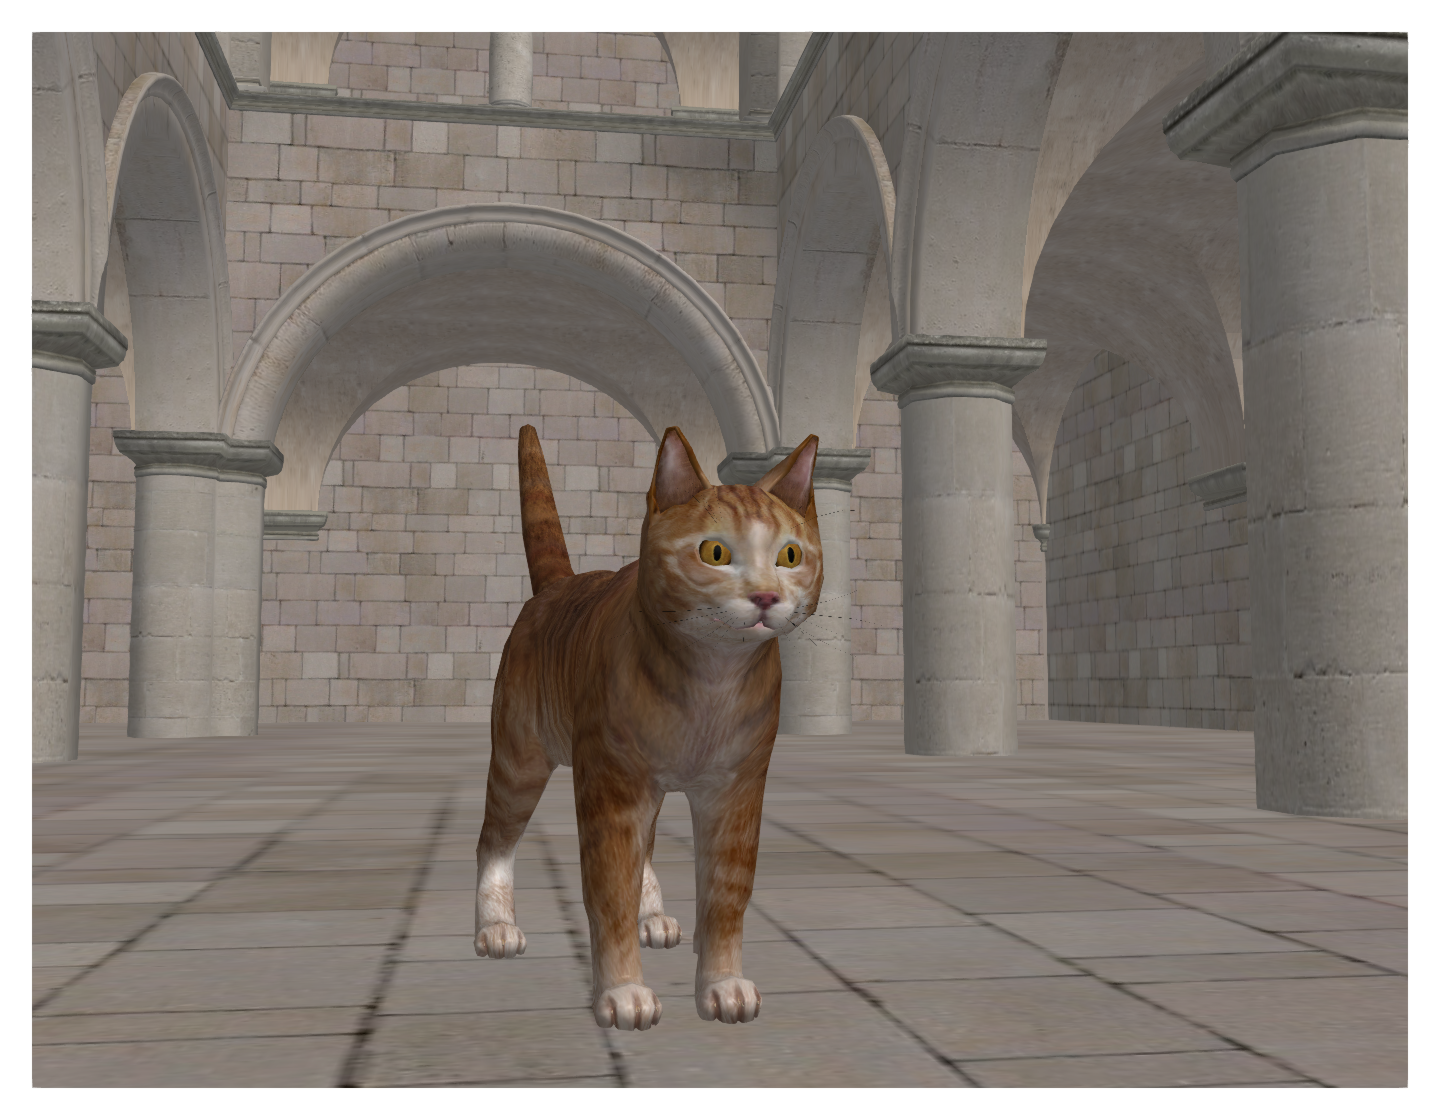
lookat is on the cat's eye, and stage_size spans about twice the cat's height around it, so the whole cat is in frame with the eye at the center.
stage_size is how much of the subject's immediate surroundings you want in view, measured in the plane through lookat. That is usually the easiest thing to state about a shot: a person among trees with the neighbouring trunks fully in frame is a stage of some 15 metres, a portrait of the same person down to the shoulders is a stage of one metre.
On a real camera that framing comes out of distance and focal length together, and either one can change it: stepping back widens the stage, and so does shortening the lens without moving. Neither number says much on its own, whereas what you care about is how large the subject is and where it sits, how much of its surroundings comes along, and how much background at what perspective. So the stage is what you state here, and the distance follows from whichever lens is mounted. That is what leaves the framing intact while you work on the lens.
The stage says nothing about the far background, which is the lens's business: a distant tree can fill the frame at any stage size.
To see what the camera does, the next figures pair each shot with a view of the same scene from the side, drawing the stage circle, the frame it is inscribed in and the rays through the frame's corners. The camera itself is the small box:
function frustum_panel(gridpos; stage_size = 1.15, mm = 50)
    lscene = new_panel(gridpos)

    # 36mm is the width of a full-frame sensor, so this is the distance at which
    # the stage fills the frame, exactly as `stage_cam!` computes it
    distance = stage_size * mm / 36
    direction = Vec3d(
        cosd(ELEVATION) * cosd(AZIMUTH), cosd(ELEVATION) * sind(AZIMUTH), sind(ELEVATION)
    )
    eye = LOOKAT + distance * direction

    # the frame lies in the plane through `lookat`, spanned by `u` (horizontal) and `v`
    u = normalize(cross(direction, Vec3d(0, 0, 1)))
    v = cross(direction, u)
    half = 0.5 * stage_size
    aspect = PANEL.width / PANEL.height
    corners = [LOOKAT + a * half * aspect * u + b * half * v for (a, b) in ((-1, -1), (1, -1), (1, 1), (-1, 1))]
    circle = [LOOKAT + half * (cos(t) * u + sin(t) * v) for t in range(0, 2pi, length = 65)]
    rays = [p for c in corners for p in (eye, eye + 8 * (c - eye))]

    # drawn twice, the second pass with `overdraw` so the hidden parts stay faintly visible
    for (alpha, overdraw) in ((1.0, false), (0.25, true))
        transparency = overdraw
        linesegments!(lscene, Point3f.(rays), color = (:dodgerblue, 0.8alpha), linewidth = 1; overdraw, transparency)
        lines!(lscene, Point3f.([corners; [corners[1]]]), color = (:dodgerblue, alpha), linewidth = 1.5; overdraw, transparency)
        lines!(lscene, Point3f.(circle), color = (:dodgerblue, alpha), linewidth = 2.5; overdraw, transparency)
        mesh!(
            lscene, Rect3f(Vec3f(eye) .- 0.09f0, Vec3f(0.18)), color = (:grey20, alpha),
            shading = NoShading; overdraw, transparency
        )
    end

    stage_cam!(
        lscene.scene; lookat = LOOKAT + 1.8 * direction, stage_size = 5,
        azimuth = AZIMUTH + 60, elevation = 30, mm = 24
    )
    return lscene
end

function comparison(labels, panels)
    fig = Figure(size = (3 * PANEL.width + 40, 2 * PANEL.height + 60))
    for (i, (label, settings)) in enumerate(zip(labels, panels))
        Label(fig[1, i], label, halign = :left, tellwidth = false)
        photo_panel(fig[2, i]; settings...)
        frustum_panel(fig[3, i]; settings...)
        colsize!(fig.layout, i, Fixed(PANEL.width))
    end
    rowsize!(fig.layout, 2, Fixed(PANEL.height))
    rowsize!(fig.layout, 3, Fixed(PANEL.height))
    rowgap!(fig.layout, 1, 4)
    rowgap!(fig.layout, 2, 8)
    return fig
end

stage_sizes = [0.29, 1.15, 2.43]
comparison(["stage_size = $s" for s in stage_sizes], [(; stage_size) for stage_size in stage_sizes])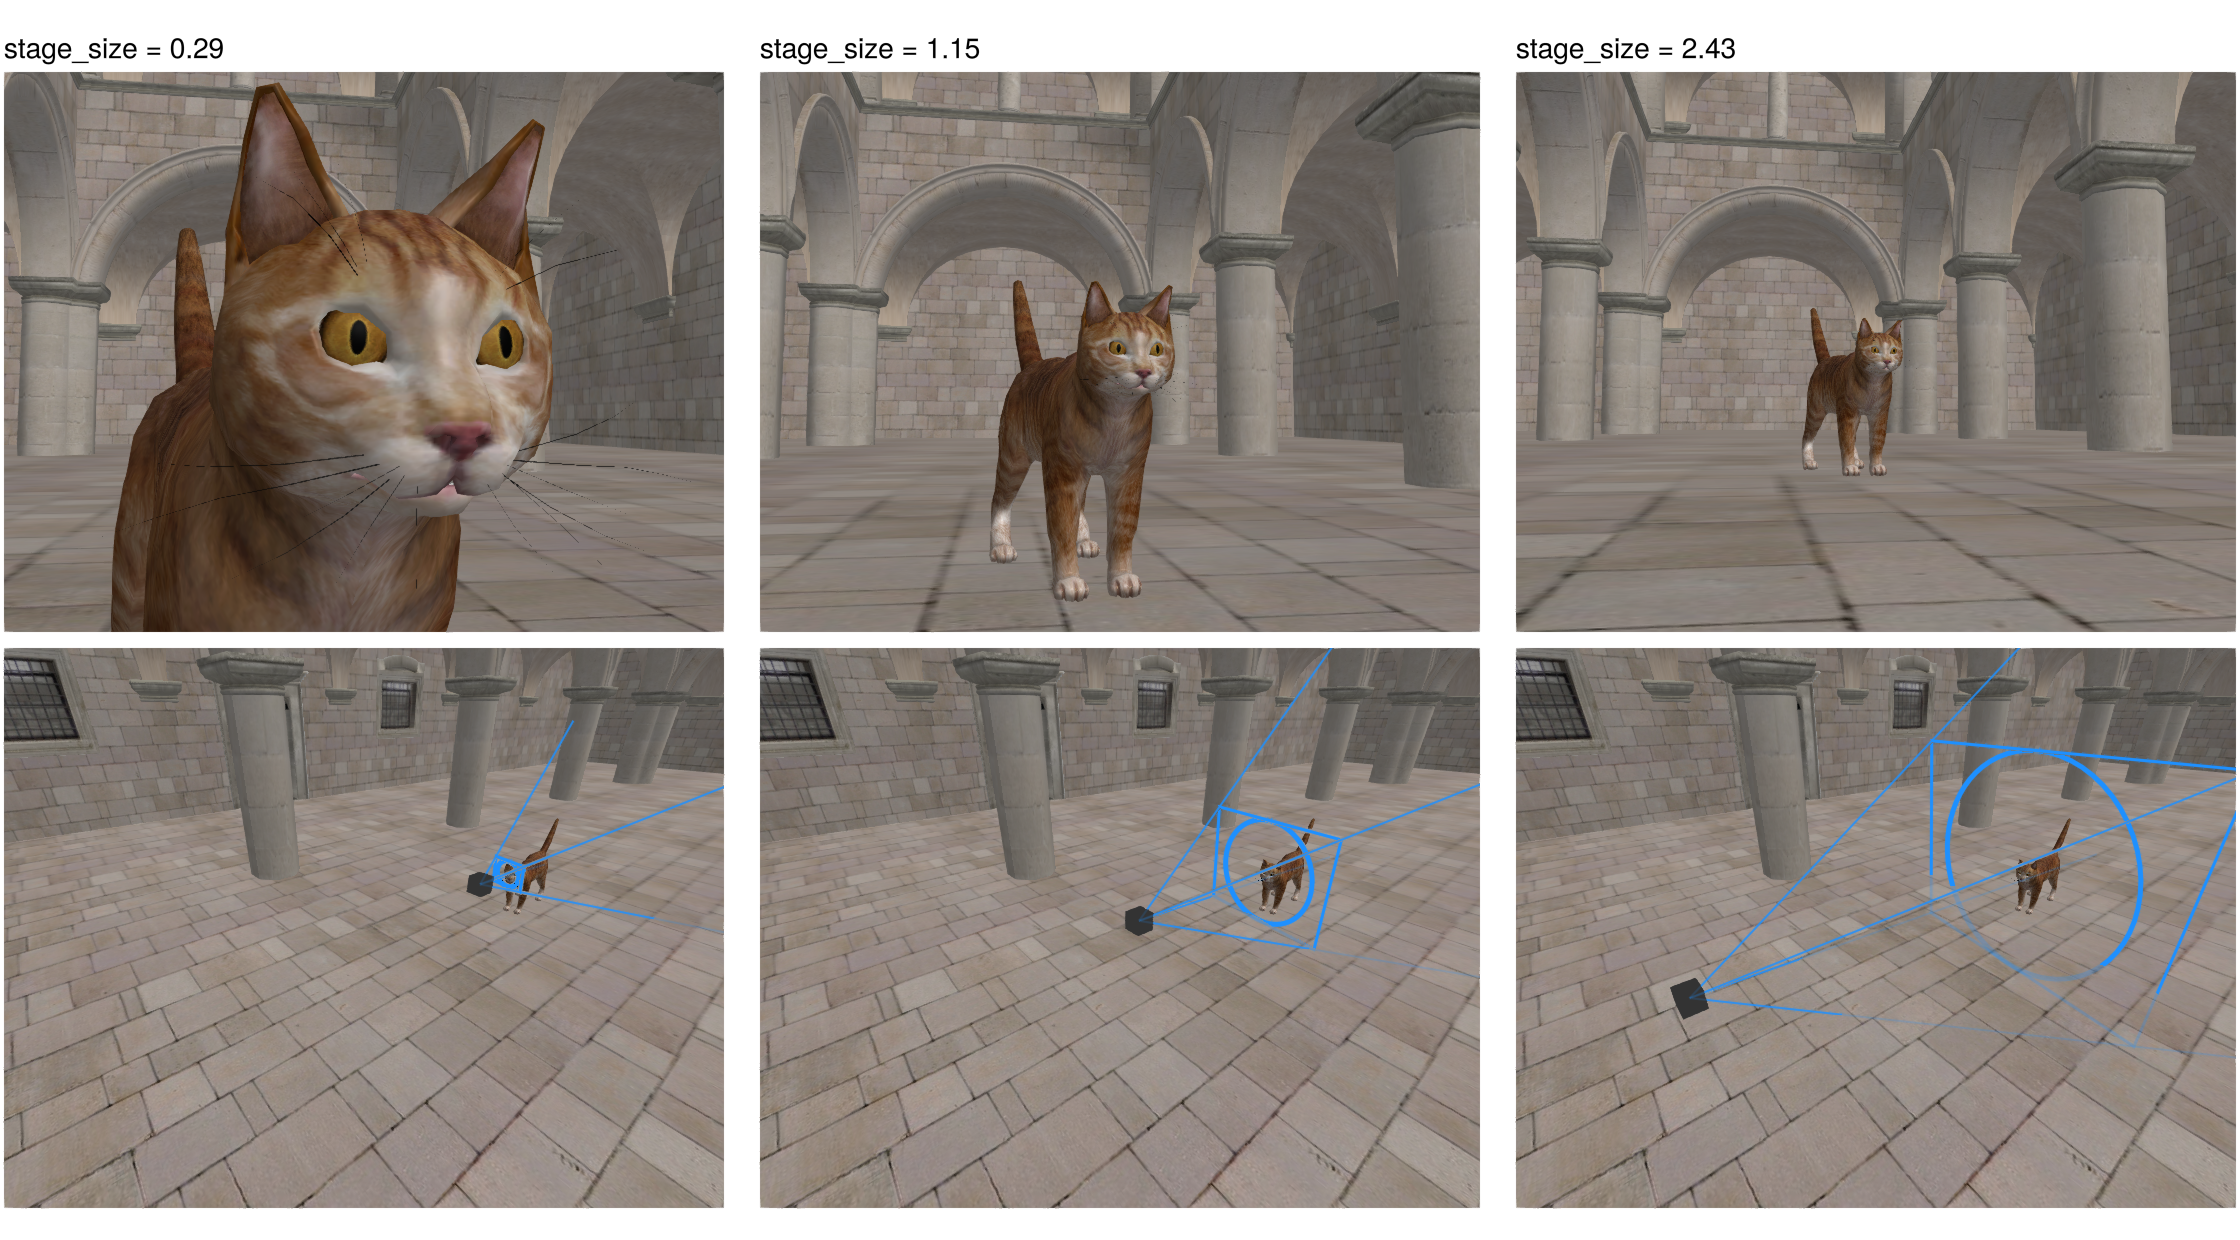
The lens is the same in all three, so the frame keeps its shape while it grows, and the camera slides back along the same axis to keep it filled.
Choosing a lens is the separate decision. Since the stage has to fit either way, mm (or fov) leaves the cat and its immediate surroundings at the size they are and changes where the camera has to stand, which is what decides how much of the distant atrium is compressed into the frame: a wide lens comes close and pushes the arches away, a long lens backs off and pulls them in flat behind the cat. This is the setting to reach for when the subject is framed the way you want but the background is not.
focal_lengths = [24, 50, 100]
comparison(["mm = $mm" for mm in focal_lengths], [(; mm) for mm in focal_lengths])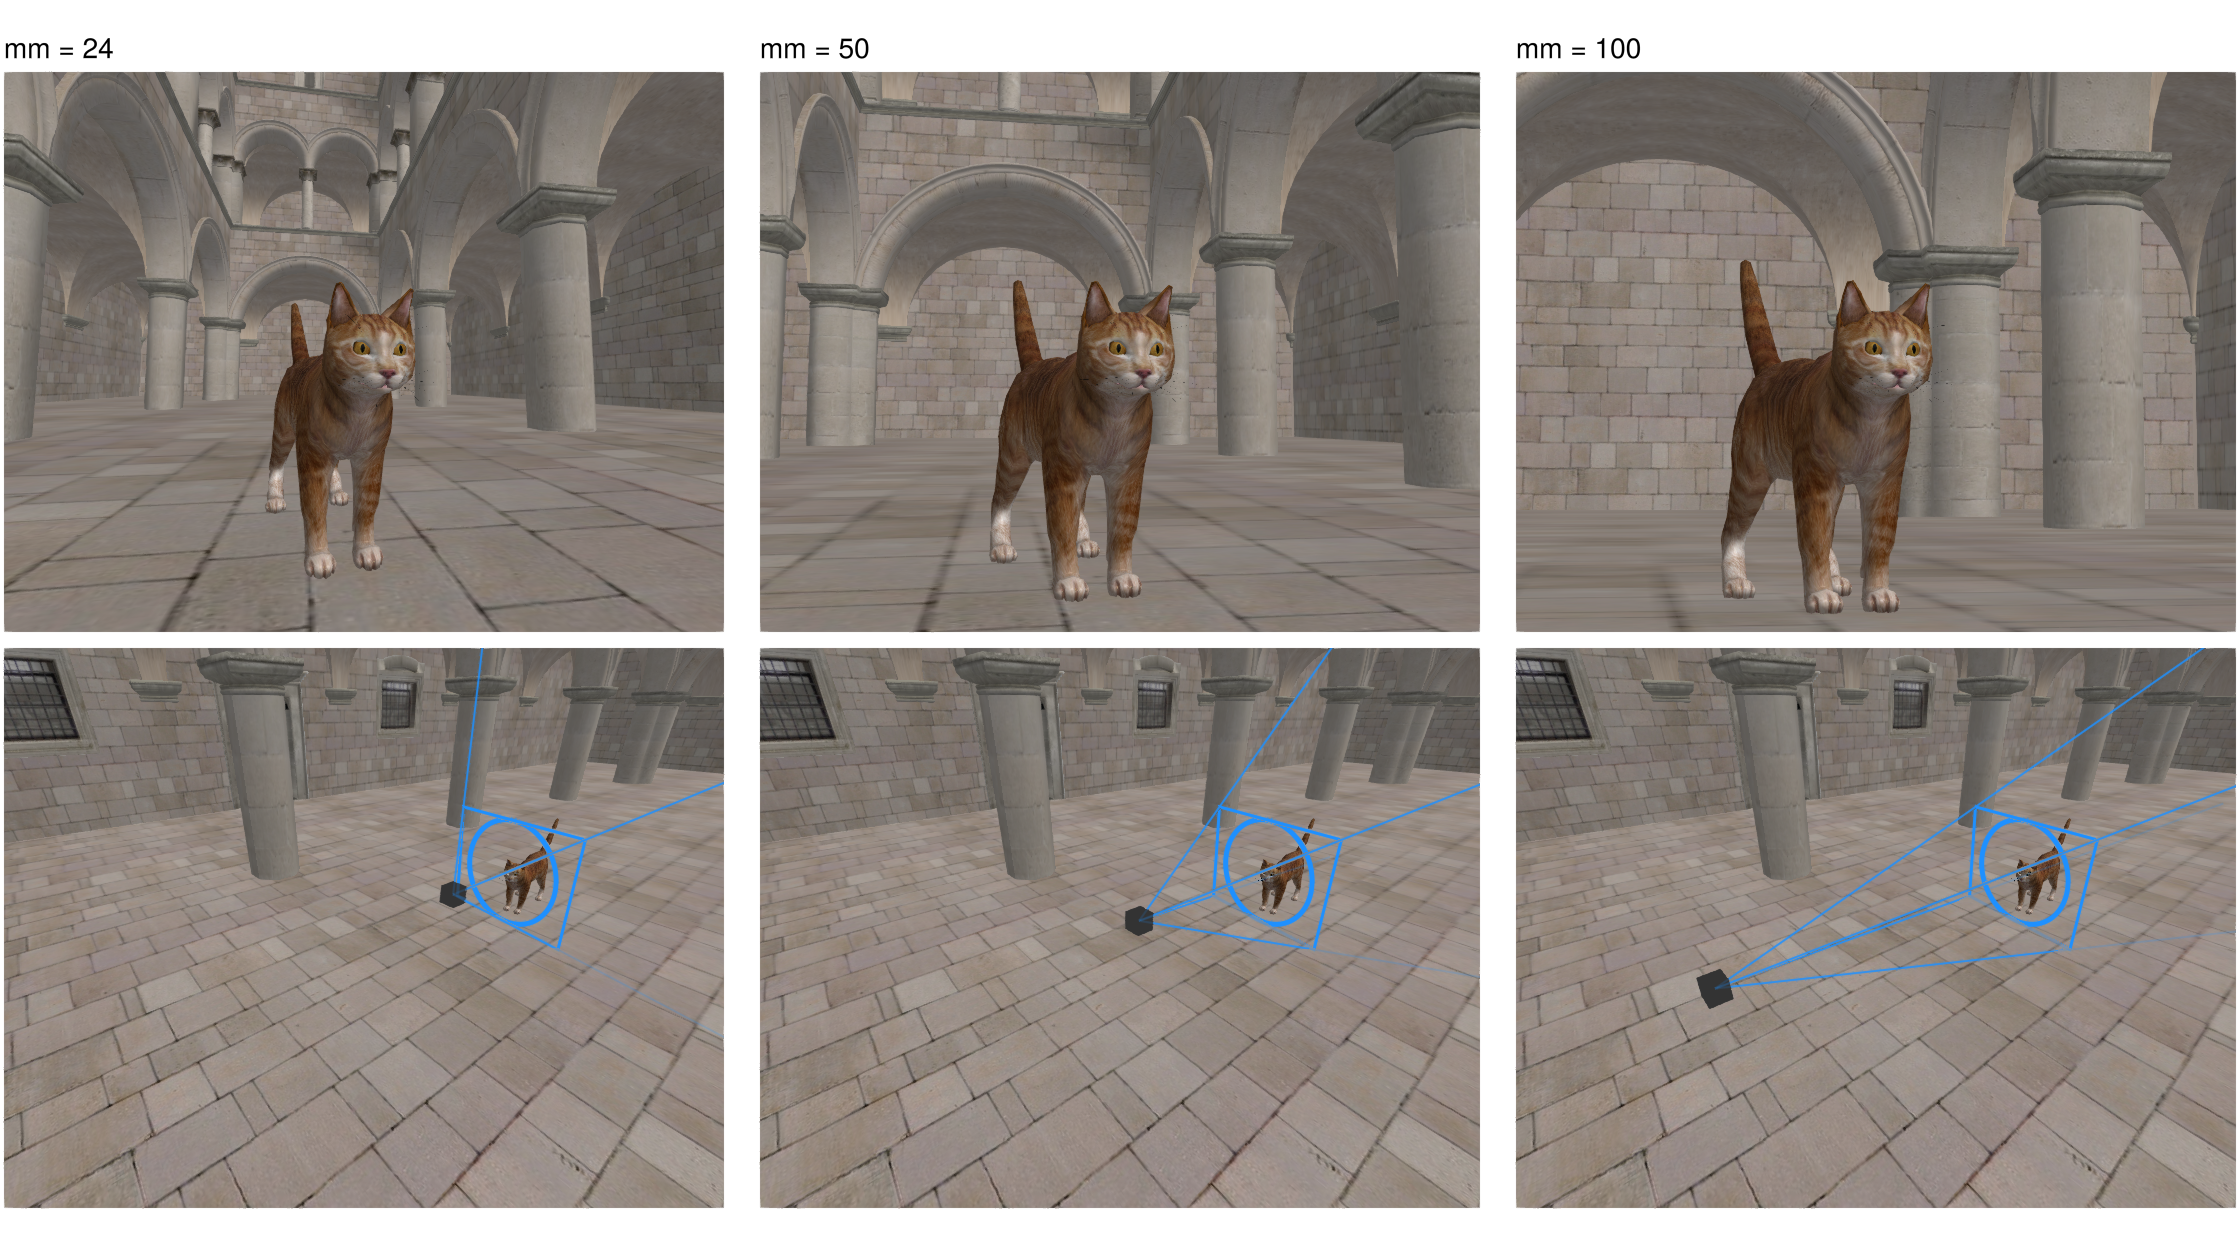
Here the circle and the frame are identical in all three panels. What changes is the camera, which moves from 0.8 to 3.2 units away while its frustum narrows from a splayed wedge to an almost parallel tube. That is the whole difference between the three photographs above.
azimuth and elevation walk the camera around the stage. Looking down from a higher elevation puts the cat in the middle of the frame with a lot of empty floor below it:
fig = Figure(size = (PANEL.width * 2, PANEL.height * 2))
Label(fig[1, 1], "azimuth = 0.5, elevation = 14.2", halign = :left, tellwidth = false)
photo_panel(fig[2, 1], stage_size = 2.43, azimuth = 0.5, elevation = 14.2)
rowgap!(fig.layout, 4)
fig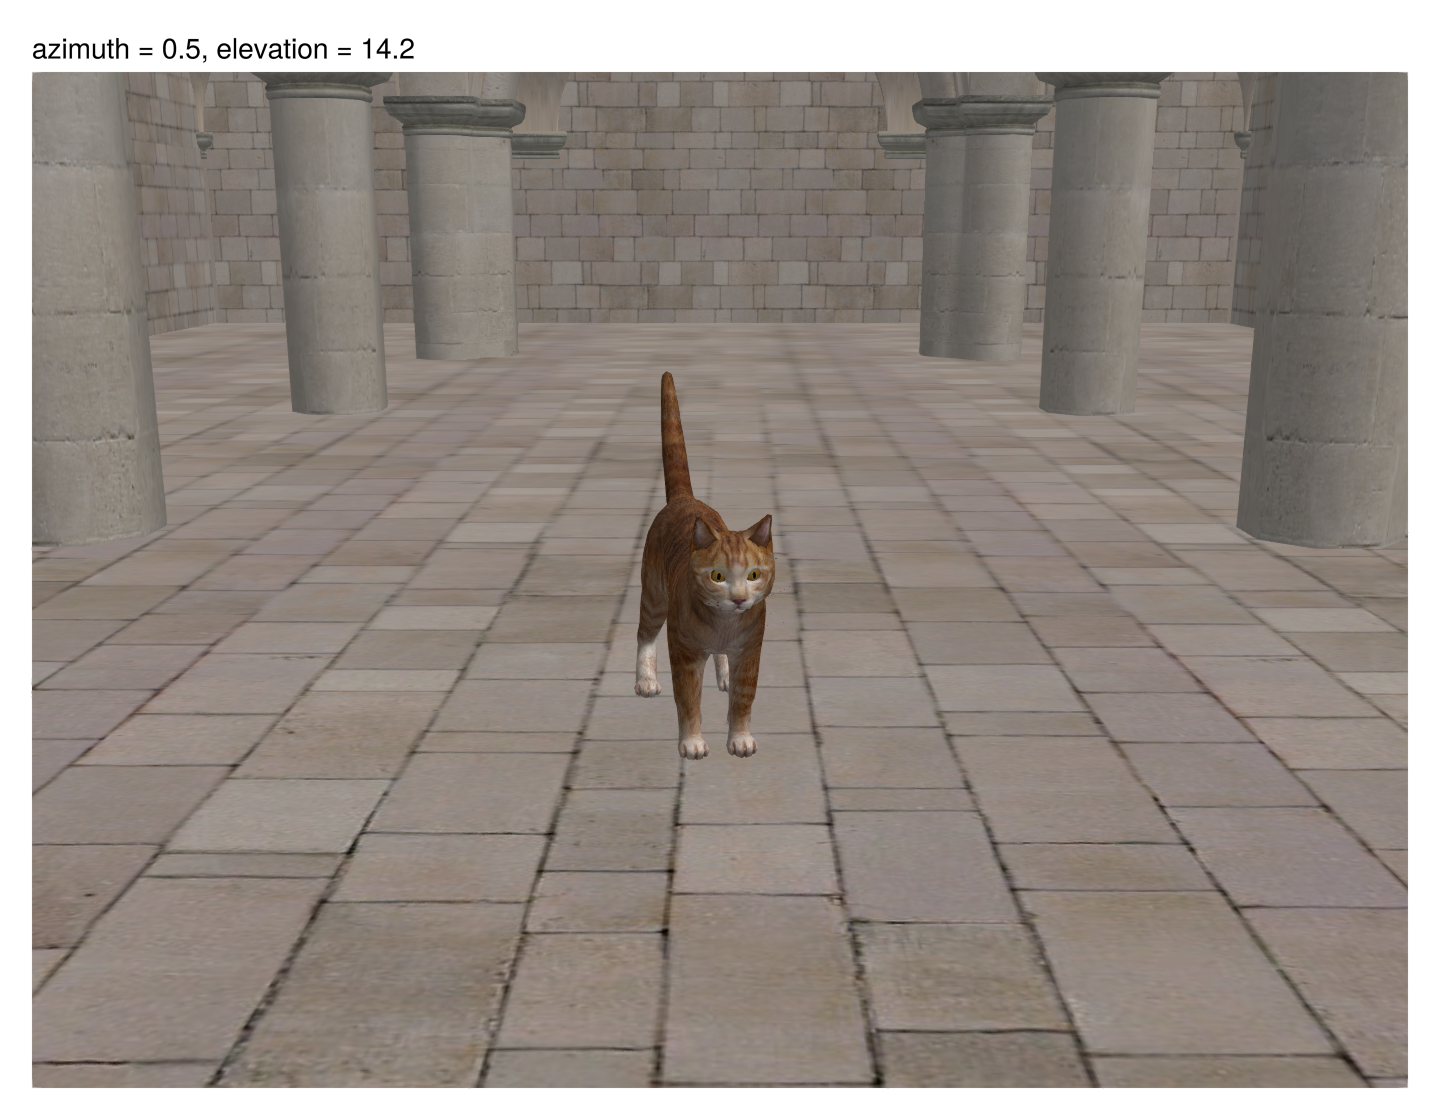
Fixing that by moving lookat would defeat the purpose, since lookat is the subject and everything rotates around it. Instead relative_offset pan and tilt the camera in fractions of the distance from the frame center to its edge, which drops the cat to the bottom of the frame and brings the arches in above it, without touching what the camera is pointed at:
fig = Figure(size = (PANEL.width * 2, PANEL.height * 2))
Label(fig[1, 1], "relative_offset = (0, 0.555)", halign = :left, tellwidth = false)
photo_panel(fig[2, 1], stage_size = 2.43, azimuth = 0.5, elevation = 14.2, relative_offset = (0, 0.555))
rowgap!(fig.layout, 4)
fig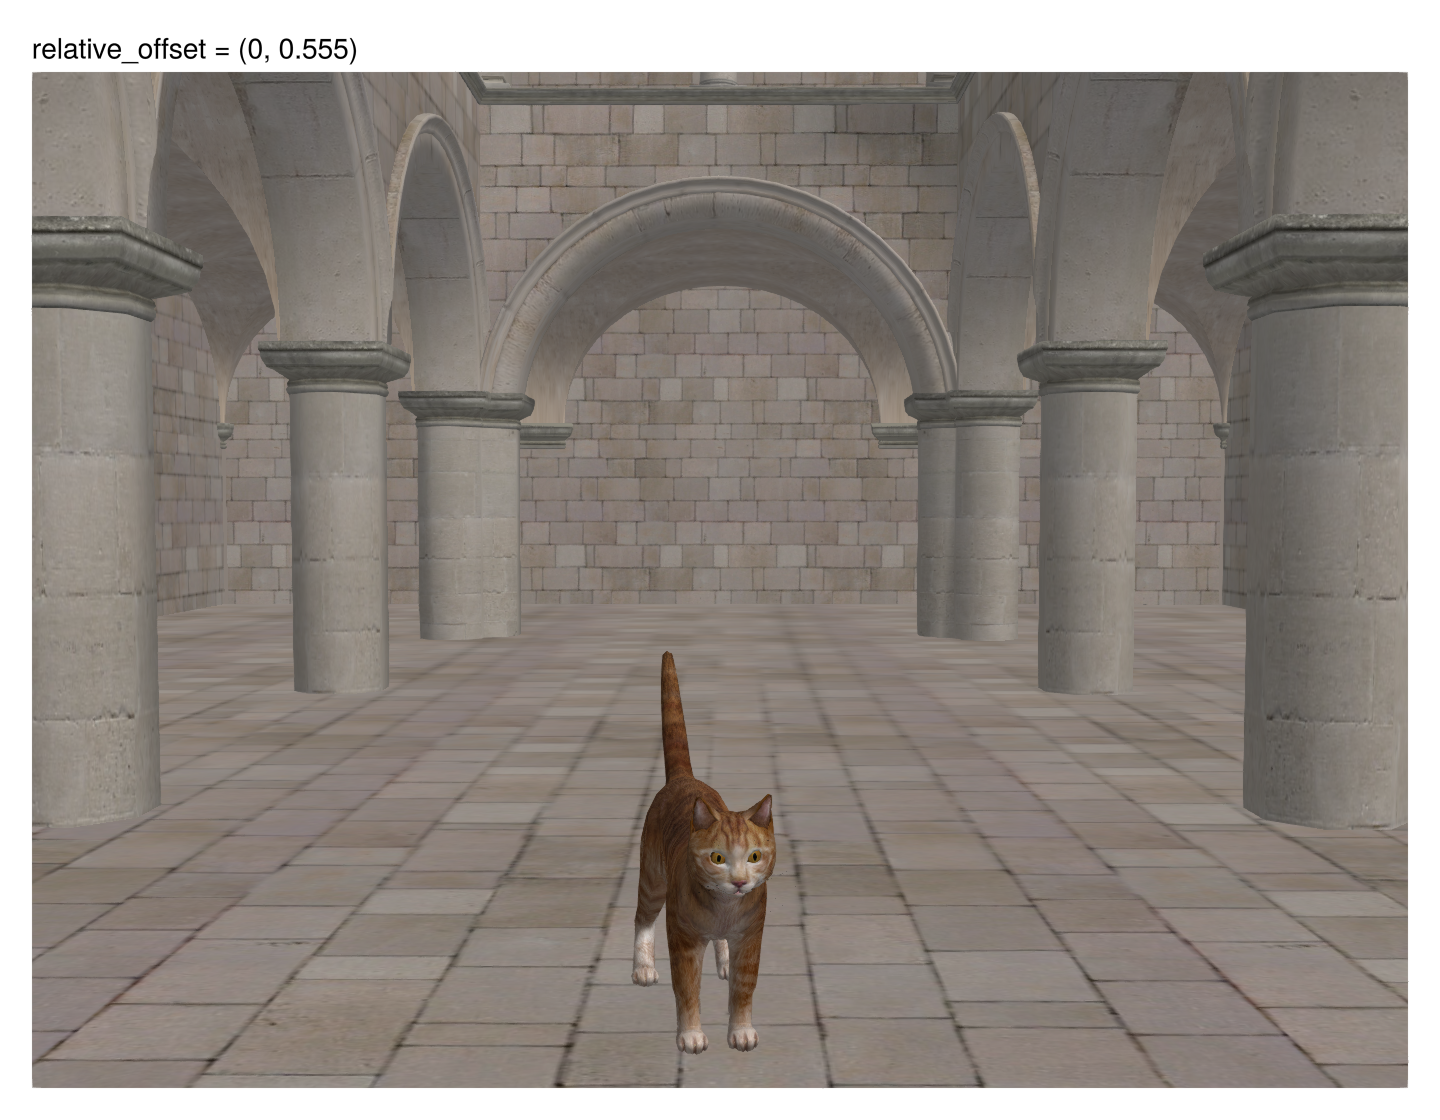
Because the fractions are relative to the frame, the same value composes the same way on any lens, and 1/3 lands on a rule-of-thirds line whatever is mounted.
Makie.StageCamera Type
StageCamera(scene; kwargs...)A 3D camera whose settings follow the order in which a photographer works a scene, so that each decision can be made and revised without undoing the previous ones:
what do I point at? ->
lookathow much around it do I want in frame? ->
stage_sizefrom which side and how high up do I shoot? ->
azimuthandelevationwhich lens do I put on? ->
fovormmwhere in the frame does the subject sit? ->
relative_offsetdo I crop the result a little? ->
crop_factor
Explanation
Adjusting a typical 3D camera means moving the camera position and changing the field of view over and over, because the two are entangled: move closer for a better angle and the subject grows, then widen the field of view to fit it again, which changes the perspective you had already settled on. Field of view ends up used as a cropping tool and perspective is whatever falls out.
A photographer does not work that way. They decide what the picture is about and how much of the surroundings belong in it, then walk around the subject to find the angle, then choose a lens. Those are separate decisions, and changing the lens does not change what the picture is about.
The stage camera keeps them separate. The lookat point and the stage_size describe a region, the stage, that stays in frame no matter what else changes. azimuth and elevation move the camera around that stage. The lens, given as fov or as a full-frame focal length in mm, then no longer decides how large the subject appears, since the stage has to fit either way: it decides how far the camera has to stand back, and so how compressed or exaggerated the perspective looks and how much of the background is drawn in. A long lens backs the camera off and flattens the scene, a wide lens pushes it close and stretches it, and the subject stays the same size in frame throughout.
Framing is separate again. relative_offset pans and tilts the camera in fractions of the frame rather than in degrees, so putting the subject on a rule-of-thirds line is the same instruction on any lens, the way it is when panning by eye through a viewfinder.
Arguments
azimuth::Real: Azimuth angle in degrees (rotation around z-axis)elevation::Real: Elevation angle in degrees (rotation from xy-plane), applied clamped to ±89.9stage_size::Real: The diameter of the region aroundlookatthat stays in viewlookat::Union{Vec3, Tuple, Vector}: Point the camera is looking atfov::Union{Nothing, Real} = nothing: Field of view in degrees (mutually exclusive with mm). Wide angles (e.g., 80°) create stronger perspective with more background visible and position the camera closer to the lookat point. Narrow angles (e.g., 20°) reduce perspective distortion, show less background, and position the camera further from the lookat point.mm::Union{Nothing, Real} = nothing: Focal length in mm relative to a classic full-frame 35mm sensor (mutually exclusive with fov). Common values: 24mm (wide angle), 50mm (normal/standard), 100mm (telephoto). Shorter focal lengths create wider fields of view with stronger perspective.nearclip::Union{Makie.Automatic, Real} = Makie.automatic: Near clipping plane distance, by default a hundredth of the camera distancefarclip::Union{Makie.Automatic, Real} = Makie.automatic: Far clipping plane distance, by default far enough to reach past everything plotted in the scene so that a small stage in a large scene does not clip the backgroundcrop_factor::Real = 1.0: Crops into the framing without moving the camera, exactly like putting the same lens on a smaller sensor, so1.5is what an APS-C body would see. It changes how much of the stage is in view but not the perspective. Reach for it when the image is as desired but should be cropped in or out a little.relative_offset::VecTypes{2} = (0.0, 0.0): Pans the camera right and tilts it up, in fractions of the distance from the frame center to its edge, so the lookat point ends up that fraction to the left of and below the center.(1, 0)pans until it reaches the left edge,(1/3, 0)until it sits on the left third of the frame. The rotation angles follow from the field of view, so the same fractions offset the frame equally at any focal length.upvector::Vec3 = Vec3d(0, 0, 1): World up direction vector
Either fov or mm must be specified, but not both.
Mouse Controls
Drag with the left mouse button: orbit around the lookat point (
azimuthandelevation)Shift + drag with the left mouse button: pan and tilt the camera so the frame follows the mouse (
relative_offset), with the drag distance matching the frame movementShift + right click: reset the pan and tilt back to a centered frame
Alt + left click: make the point under the cursor the new
lookat, so that further rotations happen around it. The camera stays where it is,azimuth,elevationandstage_sizeare derived from it.Scroll: change
stage_size, moving the camera closer or further awayShift + scroll: change focal length (
mmorfov) while keeping the stage in frame, so the camera moves closer or further awayAlt + Shift + scroll: change focal length while keeping the camera in place, which zooms into the scene in the classic sense and shrinks or grows the stage
Keyboard Controls
W/S: Move lookat forward/backward in the camera's facing direction (projected onto the plane perpendicular to the world up vector)A/D: Move lookat left/right relative to the cameraQ/E: Move lookat down/up along the world up vectorLeft/Right Arrow: Rotate azimuth (orbit around the subject)Up/Down Arrow: Change elevation (look up/down)Shift + Arrow keys: Pan and tilt the camera (relative_offset)X/Z: Increase/decrease field of view (or adjust mm focal length)V/C: Increase/decrease stage size (zoom the view in/out)
Control Settings
keyboard_translationspeed = 0.5: Speed multiplier for keyboard translationskeyboard_rotationspeed = 1.0: Speed multiplier for keyboard rotationskeyboard_zoomspeed = 1.0: Speed multiplier for keyboard focal length adjustmentskeyboard_stagesizespeed = 1.0: Speed multiplier for keyboard stage size adjustmentskeyboard_offsetspeed = 1.125: Speed multiplier for keyboard frame offsetsmouse_rotationspeed = 1.0: Speed multiplier for mouse drag rotationsmouse_offsetspeed = 1.0: Speed multiplier for mouse drag pans and tiltsmouse_zoomspeed = 1.0: Speed multiplier for focal length adjustments via scrollmouse_stagesizespeed = 1.0: Speed multiplier for stage size adjustments via scroll
Key Bindings (customizable)
forward_key = Keyboard.w: Move lookat and camera forwardbackward_key = Keyboard.s: Move lookat and camera backwardleft_key = Keyboard.a: Move lookat and camera leftright_key = Keyboard.d: Move lookat and camera rightup_key = Keyboard.e: Move lookat and camera updown_key = Keyboard.q: Move lookat and camera downazimuth_left_key = Keyboard.left: Rotate azimuth left, or pan the camera left withoffset_modazimuth_right_key = Keyboard.right: Rotate azimuth right, or pan the camera right withoffset_modelevation_up_key = Keyboard.up: Increase elevation, or tilt the camera up withoffset_modelevation_down_key = Keyboard.down: Decrease elevation, or tilt the camera down withoffset_modincrease_fov_key = Keyboard.x: Increase field of view while moving closer (stronger perspective)decrease_fov_key = Keyboard.z: Decrease field of view while moving further away (more compressed perspective)increase_stage_size_key = Keyboard.c: Increase stage size (move further away)decrease_stage_size_key = Keyboard.v: Decrease stage size (move closer)rotation_button = Mouse.left: Drag button for orbitingoffset_button = Keyboard.left_shift & Mouse.left: Drag chord for panning and tiltingreset_offset_button = Keyboard.left_shift & Mouse.right: Click chord that resetsrelative_offsetreposition_button = Keyboard.left_alt & Mouse.left: Click chord that picks a new lookat pointscroll_mod = true: Modifier that must be pressed for scroll to be handledfocal_length_mod = Keyboard.left_shift: Modifier that switches scroll from stage size to focal lengthzoom_mod = Keyboard.left_alt & Keyboard.left_shift: Modifier that switches scroll to focal length at a fixed camera positionoffset_mod = Keyboard.left_shift: Modifier that switches the arrow keys from orbiting to offsetting the frame
Example
cam = StageCamera(
    scene,
    azimuth = 45.0,
    elevation = 30.0,
    stage_size = 10.0,
    lookat = (0, 0, 0),
    mm = 50.0
)

# Update camera dynamically
cam.azimuth[] = 90.0
cam.crop_factor[] = 2.0Makie.stage_cam! Function
stage_cam!(scene; kwargs...)Creates and sets up a StageCamera for the scene. This is the preferred way to create a stage camera, similar to how cam3d! works for Camera3D.
See StageCamera for keyword arguments.
Camera and Projections
Sometimes you may need to interact with camera matrices to project data into a different space. As of Makie 0.24 you can get all the relevant matrices for this from scene.compute using the helper functions:
Makie.get_projectionview(scene, space)Makie.get_projection(scene, space)Makie.get_view(scene, space)Makie.get_preprojection(scene, space, markerspace)Makie.get_space_to_space_matrix(scene, input_space, output_space)
Example - Visualizing the camera's view box
using GLMakie
using GeometryBasics, LinearAlgebra

function frustum_snapshot(cam)
    r = Rect3f(-1, -1, -1, 2, 2, 2)
    rect_ps = Makie.convert_arguments(Lines, r)[1]
    inv_pv = inv(cam.projectionview[])
    return map(rect_ps) do p
        p = inv_pv * to_ndim(Point4f, p, 1)
        return p[Vec(1,2,3)] / p[4]
    end
end


ex = Point3f(1,0,0)
ey = Point3f(0,1,0)
ez = Point3f(0,0,1)

fig = Figure()

# Set up Scene shown by a camera
scene = LScene(fig[1, 1])
cc = Makie.Camera3D(scene.scene, projectiontype = Makie.Perspective, center = false)

linesegments!(scene, Rect3f(Point3f(-1), Vec3f(2)), color = :black)
linesegments!(scene,
    [-ex, ex, -ey, ey, -ez, ez],
    color = [:red, :red, :green, :green, :blue, :blue]
)
center!(scene.scene)

cam = scene.scene.camera
eyeposition = cc.eyeposition
lookat = cc.lookat
frustum = map(pv -> frustum_snapshot(cam), cam.projectionview)

# Set up scene visualizing the cameras view
scene = LScene(fig[1, 2])
_cc = Makie.Camera3D(scene.scene, projectiontype = Makie.Orthographic, center = false)
lines!(scene, frustum, color = :blue, linestyle = :dot)
scatter!(scene, eyeposition, color = :black)
scatter!(scene, lookat, color = :black)

linesegments!(scene,
    [-ex, ex, -ey, ey, -ez, ez],
    color = [:red, :red, :green, :green, :blue, :blue]
)
linesegments!(scene, Rect3f(Point3f(-1), Vec3f(2)), color = :black)

# Tweak initial camera position
update_cam!(scene.scene, Vec3f(4.5, 2.5, 3.5), Vec3f(0))
update_cam!(scene.scene, Vec3f(6, 8, 5), Vec3f(0))

fig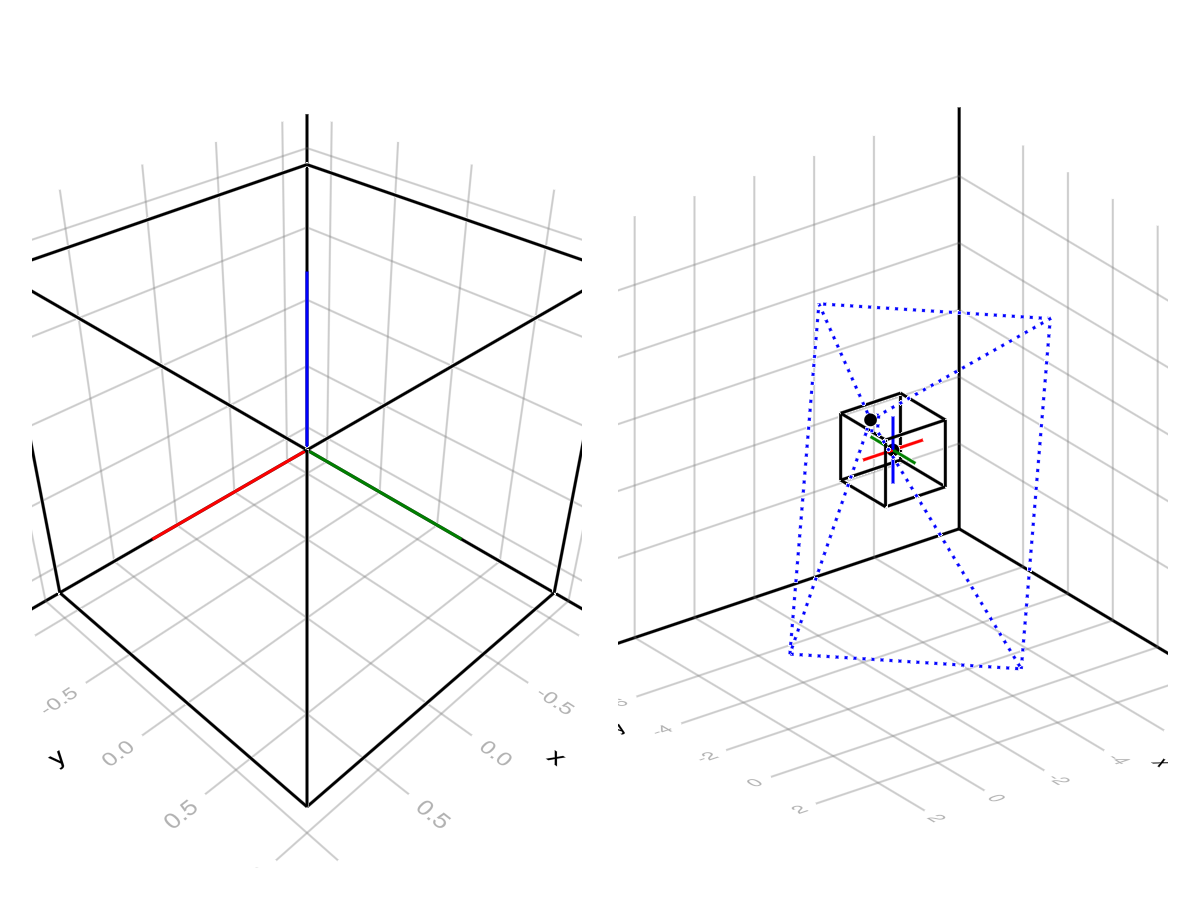
General Remarks
Buttons passed to the 2D and 3D camera are forwarded to ispressed. As such you can pass false to disable an interaction, true to ignore a modifier, any button, collection of buttons or even logical expressions of buttons. See the events documentation for more details.