RPRMakie
Experimental ray tracing backend using AMDs RadeonProRender. While it's created by AMD and tailored to Radeon GPUs, it still works just as well for NVidia and Intel GPUs using OpenCL. It also works on the CPU and even has a hybrid modus to use GPUs and CPUs in tandem to render images.
RadeonProRender currently only works on Windows and Linux, and crashes on OSX when creating the most basic context. If you're on OSX and good at debugging segfaults, help us by debugging:
using RadeonProRender
RadeonProRender.Context()
To use RPRMakie on a Mac with an M-series chip, for now, you need to use the x86_64 build of Julia (not the ARM build, you may have to download this manually). RadeonProRender does not distribute binaries built for the ARM architecture of the M-series processors yet.
Activation and screen config
Activate the backend by calling RPRMakie.activate!() with the following options:
RPRMakie.activate! Function
RPRMakie.activate!(; screen_config...)Sets RPRMakie as the currently active backend and also allows to quickly set the screen_config. Note, that the screen_config can also be set permanently via Makie.set_theme!(RPRMakie=(screen_config...,)).
Arguments one can pass via screen_config:
iterations = 200: Iterations of light simulations. The more iterations, the less noisy the picture becomes, but higher numbers take much longer. For e.g.iterations=10one should expect rendering to take a couple of seconds but it will produce pretty noisy output. 200 is a good middle ground taking around ~30s on an old nvidia 1060. For highest quality output, numbers above 500 are required.resource = RPR.RPR_CREATION_FLAGS_ENABLE_GPU0: GPU or CPU to use. Multiple GPUs and CPUs can be used together by using&(e.g.RPR.RPR_CREATION_FLAGS_ENABLE_GPU0 & RPR.RPR_CREATION_FLAGS_ENABLE_CPU).plugin = RPR.Tahoe:RPR.Tahoe, the legacy RadeonProRender backend. It's the most stable, but doesn't have all new features (e.g. theRPR.MatXmaterial), and may be slower than othersRPR.Northstar, the new rewritten backend, faster and optimized for many iterations. Single iterations are much slower, so less usable for interactive display. Sometimes, Northstar just produces black, jiggly objects. It's not clear yet, if that's just a bug, or the result of using an unsupported/deprecated feature. Switch toTahoeif that happens.RPR.Hybrid: Vulkan backend, fit for real time rendering, using AMDs and NVIDIAs new hardware accelerated ray tracing. Doesn't work reliably yet and only works withRPR.Ubermaterial.RPR.HybridPro: The same as Hybrid, but works only for Radeon GPUs, using AMDs own hardware acceleration API.
Since RPRMakie is quite the unique backend and still experimental, there are several gotchas when working with it.
fig = Figure(); # RPRMakie can't show Figures yet, since it only supports a physical 3D camera
radiance = 10000
# Lights are much more important for ray tracing,
# so most examples will use extra lights and environment lights.
# Note, that RPRMakie is the only backend
# supporting multiple light sources and EnvironmentLights right now
lights = [
    EnvironmentLight(0.5, Makie.FileIO.load(RPR.assetpath("studio026.exr"))),
    PointLight(Vec3f(0, 0, 20), RGBf(radiance, radiance, radiance))
]

# Only LScene is supported right now,
# since the other projections don't map to the physical accurate Camera in RPR.
ax = LScene(fig[1, 1]; show_axis = false, scenekw=(lights=lights,))
# Note that since RPRMakie doesn't yet support text (this is being worked on!),
# you can't show a 3d axis yet.

# To create materials, one needs access to the RPR context.
# Note, if you create an Screen manually, don't display the scene or fig
# anymore, since that would create a new RPR context, in which resources from the
# manually created Context would be invalid. Since RPRs error handling is pretty
# bad, this usually results in Segfaults.
# See below how to render a picture with a manually created context
screen = RPRMakie.Screen(ax.scene; iterations=10, plugin=RPR.Northstar)
matsys = screen.matsys
context = screen.context
# You can use lots of materials from RPR.
# Note, that this API may change in the future to a backend  independent representation
# Or at least one, that doesn't need to access the RPR context
mat = RPR.Chrome(matsys)
# The material attribute is specific to RPRMakie and gets ignored by other Backends. This may change in the future
mesh!(ax, Sphere(Point3f(0), 1), material=mat)

# There are three main ways to turn a Makie scene into a picture:
# Get the colorbuffer of the Screen. Screen also has `show` overloaded for the MIME `image/png`
# so it should display in IJulia/Jupyter/VSCode.
image = colorbuffer(screen)::Matrix{RGB{N0f8}}
# Replace a specific (sub) LScene with RPR, and display the whole scene interactively in RPRMakie
using RPRMakie
refresh = Observable(nothing) # Optional observable that triggers rerendering
display(ax.scene; backend=GLMakie) # Make sure to display scene first in GLMakie
# Replace the scene with an interactively rendered RPR output.
# See more about this in the RPRMakie interop example
context, task = RPRMakie.replace_scene_rpr!(ax.scene, screen; refresh=refresh)
# If one doesn't create the Screen manually to create custom materials,
# display(ax.scene), show(io, MIME"image/png", ax.scene), save("rpr.png", ax.scene)
# Should work just like with other backends.
# Note, that only the scene from LScene can be displayed directly, but soon, `display(fig)` should also work.
There are several examples showing different aspects of how to use RPRMakie. The examples are in RPRMakie/examples
MaterialX and predefined materials (materials.jl)
There are several predefined materials one can use in RadeonProRender. RPR also supports the MaterialX standard to load a wide range of predefined Materials. Make sure to use the Northstar backend for MaterialX.
using GeometryBasics, RPRMakie
using Colors, FileIO
using Colors: N0f8

radiance = 500
lights = [EnvironmentLight(1.0, load(RPR.assetpath("studio026.exr"))),
            PointLight(Vec3f(10), RGBf(radiance, radiance, radiance * 1.1))]
fig = Figure(; size=(1500, 700));
ax = LScene(fig[1, 1]; show_axis=false, scenekw=(; lights=lights))
screen = RPRMakie.Screen(ax.scene; plugin=RPR.Northstar, iterations=400)

matsys = screen.matsys
emissive = RPR.EmissiveMaterial(matsys)
diffuse = RPR.DiffuseMaterial(matsys)
glass = RPR.Glass(matsys)
plastic = RPR.Plastic(matsys)
chrome = RPR.Chrome(matsys)
dielectric = RPR.DielectricBrdfX(matsys)
gold = RPR.SurfaceGoldX(matsys)

materials = [glass chrome;
                gold dielectric;
                emissive plastic]

mesh!(ax, GeometryBasics.Mesh(load(Makie.assetpath("matball_floor.obj"))); color=:white)
palette = reshape(Makie.wong_colors()[1:6], size(materials))

for i in CartesianIndices(materials)
    x, y = Tuple(i)
    mat = materials[i]
    mplot = if mat === emissive
        matball!(ax, diffuse; inner=emissive, color=nothing)
    else
        matball!(ax, mat; color=nothing)
    end
    v = Vec3f(((x, y) .- (0.5 .* size(materials)) .- 0.5)..., 0)
    translate!(mplot, 0.9 .* (v .- Vec3f(0, 3, 0)))
end
cam = cameracontrols(ax.scene)
cam.eyeposition[] = Vec3f(-0.3, -5.5, 0.9)
cam.lookat[] = Vec3f(0.5, 0, -0.5)
cam.upvector[] = Vec3f(0, 0, 1)
cam.fov[] = 35
emissive.color = Vec3f(4, 2, 2)
image = colorbuffer(screen)
save("materials.png", image)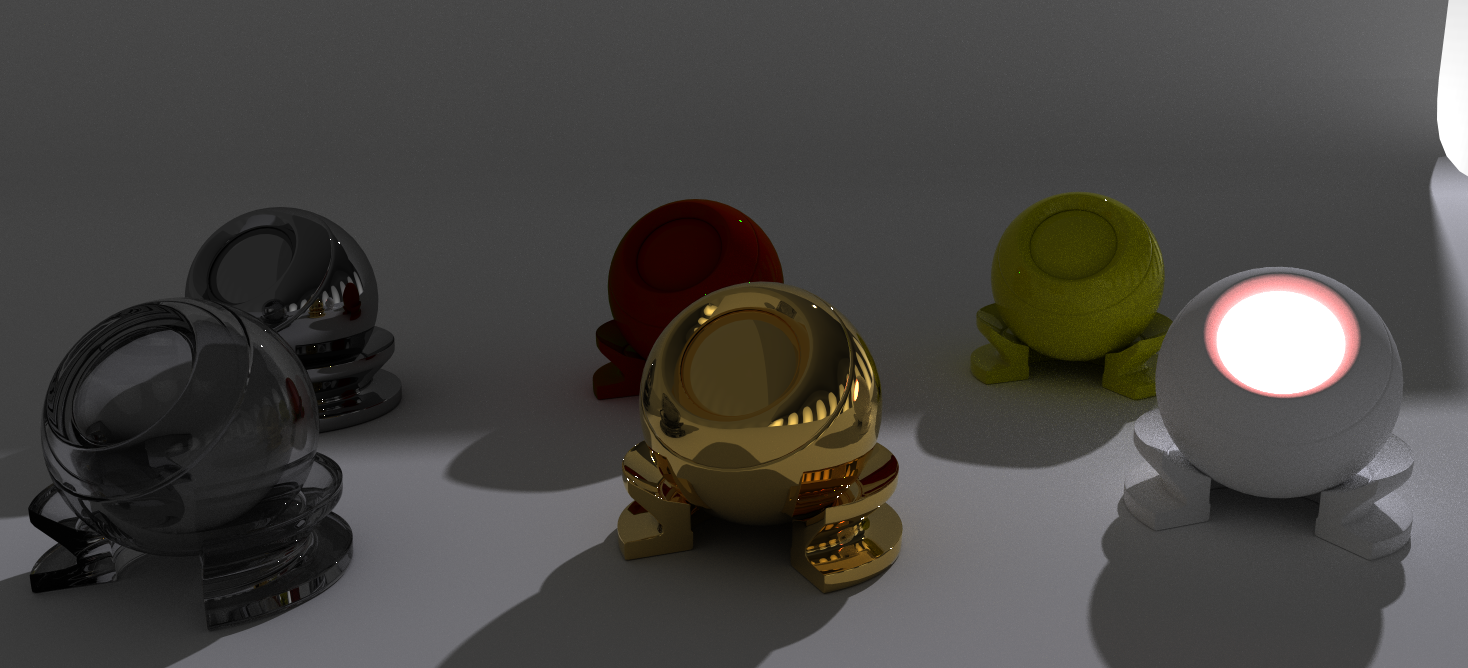
Advanced custom material (earth_topography.jl)
using NCDatasets, ColorSchemes, RPRMakie
using ImageShow, FileIO

# Taken from https://lazarusa.github.io/BeautifulMakie/GeoPlots/topography/
cmap = dataset = Dataset(joinpath(@__DIR__, "ETOPO1_halfdegree.nc"))
lon = dataset["lon"][:]
lat = dataset["lat"][:]
data = Float32.(dataset["ETOPO1avg"][:, :])

function glow_material(data_normed)
    emission_weight = map(data_normed) do i
        return Float32(i < 0.7 ? 0.0 : i)
    end
    emission_color = map(data_normed) do i
        em = i * 2
        return RGBf(em * 2.0, em * 0.4, em * 0.3)
    end

    return (
        reflection_weight = 1,
        reflection_color = RGBf(0.5, 0.5, 1.0),
        reflection_metalness = 0,
        reflection_ior = 1.4,
        diffuse_weight = 1,
        emission_weight = emission_weight',
        emission_color = emission_color',
    )
end

RPRMakie.activate!(iterations=32, plugin=RPR.Northstar)
fig = Figure(; size=(2000, 800))
radiance = 30000
lights = [EnvironmentLight(1.0, load(RPR.assetpath("studio026.exr"))),
            PointLight(Vec3f(0, 100, 100), RGBf(radiance, radiance, radiance))]

ax = LScene(fig[1, 1]; show_axis=false, scenekw=(lights=lights,))

mini, maxi = extrema(data)
data_normed = ((data .- mini) ./ (maxi - mini))

material = glow_material(data_normed)

pltobj = surface!(ax, lon, lat, data_normed .* 20;
                    material=material, colormap=[:black, :white, :brown],
                    colorrange=(0.2, 0.8) .* 20)
# Set the camera to a nice angle
cam = cameracontrols(ax.scene)
cam.eyeposition[] = Vec3f(3, -300, 300)
cam.lookat[] = Vec3f(0)
cam.upvector[] = Vec3f(0, 0, 1)
cam.fov[] = 23

save("topographie.png", ax.scene)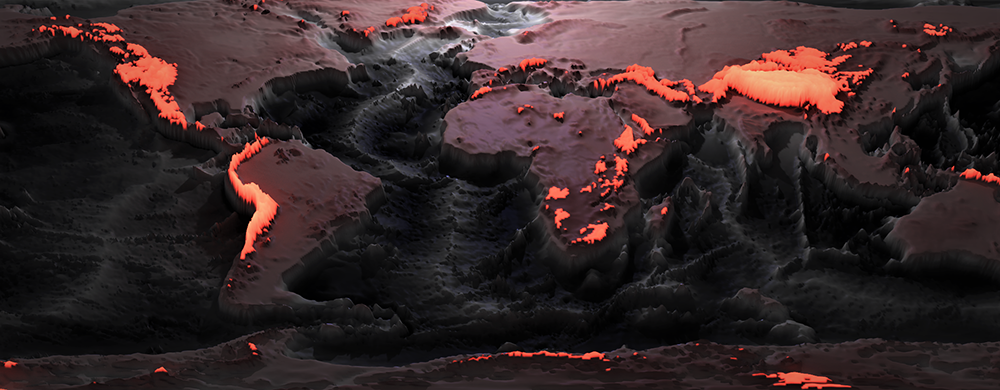
RPRMakie interop (opengl_interop.jl)
RPRMakie doesn't support layouting and sub scenes yet, but you can replace a single scene with a RPR rendered, interactive window. This is especially handy, to show 2d graphics and interactive UI elements next to a ray traced scene and interactively tune camera and material parameters.
using RPRMakie, GeometryBasics, RPRMakie, RadeonProRender
using Colors, FileIO
using Colors: N0f8

f = (u, v) -> cos(v) * (6 - (5 / 4 + sin(3u)) * sin(u - 3v))
g = (u, v) -> sin(v) * (6 - (5 / 4 + sin(3u)) * sin(u - 3v))
h = (u, v) -> -cos(u - 3v) * (5 / 4 + sin(3u));
u = range(0; stop=2π, length=150)
v = range(0; stop=2π, length=150)
radiance = 500
lights = [EnvironmentLight(1.0, load(RPR.assetpath("studio026.exr"))),
          PointLight(Vec3f(10), RGBf(radiance, radiance, radiance * 1.1))]

fig = Figure(; size=(1500, 1000))
ax = LScene(fig[1, 1]; show_axis=false, scenekw=(; lights))
screen = RPRMakie.Screen(size(ax.scene); plugin=RPR.Tahoe)
material = RPR.UberMaterial(screen.matsys)

surface!(ax, f.(u, v'), g.(u, v'), h.(u, v'); ambient=Vec3f(0.5), diffuse=Vec3f(1),
         specular=0.5, colormap=:balance, material)

function Input(fig, val::RGB)
    hue = Slider(fig; range=1:380, width=200)
    lightness = Slider(fig; range=LinRange(0, 1, 100), width=200)
    labels = [Label(fig, "hue"; halign=:left), Label(fig, "light"; halign=:left)]
    layout = grid!(hcat(labels, [hue, lightness]))
    hsl = HSL(val)
    set_close_to!(hue, hsl.h)
    set_close_to!(lightness, hsl.l)
    color = map((h, l) -> RGB(HSL(h, 0.9, l)), hue.value, lightness.value)
    return color, layout
end

function Input(fig, val::Vec4)
    s = Slider(fig; range=LinRange(0, 1, 100), width=200)
    set_close_to!(s, first(val))
    return map(Vec4f, s.value), s
end

function Input(fig, val::Bool)
    toggle = Toggle(fig; active=val)
    return toggle.active, toggle
end

reflection_sliders = (
    reflection_color=Input(fig, RGB(0, 0, 0)),
    reflection_weight=Input(fig, Vec4(0)),
    reflection_roughness=Input(fig, Vec4(0)),
    reflection_anisotropy=Input(fig, Vec4(0)),
    reflection_anisotropy_rotation=Input(fig, Vec4(0)),
    reflection_mode=Input(fig, Vec4(0)),
    reflection_ior=Input(fig, Vec4(0)),
    reflection_metalness=Input(fig, Vec4(0)),
)
refraction_sliders = (
    refraction_color=Input(fig, RGB(0, 0, 0)),
    refraction_weight=Input(fig, Vec4(0)),
    refraction_roughness=Input(fig, Vec4(0)),
    refraction_ior=Input(fig, Vec4(0)),
    refraction_absorption_color=Input(fig, RGB(0, 0, 0)),
    refraction_absorption_distance=Input(fig, Vec4(0)),
    refraction_caustics=Input(fig, true),
)
sss_sliders = (
    sss_scatter_color=Input(fig, RGB(0, 0, 0)),
    sss_scatter_distance=Input(fig, Vec4(0)),
    sss_scatter_direction=Input(fig, Vec4(0)),
    sss_weight=Input(fig, Vec4(0)),
    sss_multiscatter=Input(fig, false),
)
backscatter_sliders = (
    backscatter_weight=Input(fig, Vec4(0)),
    backscatter_color=Input(fig, RGB(0, 0, 0))
)
sliders = merge(reflection_sliders, refraction_sliders,
                sss_sliders, backscatter_sliders)

labels = []
inputs = []
refresh = Observable(nothing)
for (key, (obs, input)) in pairs(sliders)
    push!(labels, Label(fig, string(key); align=:left))
    push!(inputs, input)
    on(obs) do value
        setproperty!(material, key, value)
        return notify(refresh)
    end
end

fig[1, 2] = grid!(hcat(labels, inputs); width=500)
RPRMakie.activate!()

cam = cameracontrols(ax.scene)
cam.eyeposition[] = Vec3f(22, 0, 17)
cam.lookat[] = Vec3f(0, 0, -1)
cam.upvector[] = Vec3f(0, 0, 1)
cam.fov[] = 30

display(fig)

context, task = RPRMakie.replace_scene_rpr!(ax.scene, screen; refresh=refresh)

# Change light parameters interactively
begin
    lights[1].intensity[] = 1.5
    lights[2].radiance[] = RGBf(1000, 1000, 1000)
    lights[2].position[] = Vec3f(3, 10, 10)
    notify(refresh)
end
Animations (lego.jl)
Not all objects support updating via Observables yet, but translations, camera etc are already covered and can be used together with Makie's standard animation API.
# Example inspiration and Lego model by https://github.com/Kevin-Mattheus-Moerman
# https://twitter.com/KMMoerman/status/1417759722963415041
using MeshIO, FileIO, GeometryBasics, RPRMakie
colors = Dict(
"eyes" => "#000",
"belt" => "#000059",
"arm" => "#009925",
"leg" => "#3369E8",
"torso" => "#D50F25",
"head" => "yellow",
"hand" => "yellow"
)
origins = Dict(
"arm_right" => Point3f(0.1427, -6.2127, 5.7342),
"arm_left" => Point3f(0.1427, 6.2127, 5.7342),
"leg_right" => Point3f(0, -1, -8.2),
"leg_left" => Point3f(0, 1, -8.2),
)
rotation_axes = Dict(
"arm_right" => Vec3f(0.0000, -0.9828, 0.1848),
"arm_left" => Vec3f(0.0000, 0.9828, 0.1848),
"leg_right" => Vec3f(0, -1, 0),
"leg_left" => Vec3f(0, 1, 0),
)
function plot_part!(scene, parent, name::String)
m = load(assetpath("lego_figure_" * name * ".stl"))
color = colors[split(name, "_")[1]]
trans = Transformation(parent)
ptrans = Makie.transformation(parent)
origin = get(origins, name, nothing)
if !isnothing(origin)
centered = m.position .- origin
m = GeometryBasics.mesh(m, position = centered)
translate!(trans, origin)
else
translate!(trans, -ptrans.translation[])
end
return mesh!(scene, m; color=color, transformation=trans)
end
function plot_lego_figure(s, floor=true)
# Plot hierarchical mesh!
figure = Dict()
# Plot hierarchical mesh!
figure["torso"] = plot_part!(s, s, "torso")
figure["head"] = plot_part!(s, figure["torso"], "head")
figure["eyes_mouth"] = plot_part!(s, figure["head"], "eyes_mouth")
figure["arm_right"] = plot_part!(s, figure["torso"], "arm_right")
figure["hand_right"] = plot_part!(s, figure["arm_right"], "hand_right")
figure["arm_left"] = plot_part!(s, figure["torso"], "arm_left")
figure["hand_left"] = plot_part!(s, figure["arm_left"], "hand_left")
figure["belt"] = plot_part!(s, figure["torso"], "belt")
figure["leg_right"] = plot_part!(s, figure["belt"], "leg_right")
figure["leg_left"] = plot_part!(s, figure["belt"], "leg_left")
# lift the little guy up
translate!(figure["torso"], 0, 0, 20)
# add some floor
floor && mesh!(s, Rect3f(Vec3f(-400, -400, -2), Vec3f(800, 800, 2)), color=:white)
return figure
end
RPRMakie.activate!(iterations=200, plugin=RPR.Northstar)
radiance = 50000
lights = [
EnvironmentLight(1.5, rotl90(load(assetpath("sunflowers_1k.hdr"))')),
PointLight(Vec3f(50, 0, 200), RGBf(radiance, radiance, radiance*1.1)),
]
s = Scene(size=(500, 500), lights=lights)
cam3d!(s)
c = cameracontrols(s)
c.near[] = 5
c.far[] = 1000
update_cam!(s, c, Vec3f(100, 30, 80), Vec3f(0, 0, -10))
figure = plot_lego_figure(s)
rot_joints_by = 0.25*pi
total_translation = 50
animation_strides = 10
a1 = LinRange(0, rot_joints_by, animation_strides)
angles = [a1; reverse(a1[1:end-1]); -a1[2:end]; reverse(-a1[1:end-1]);]
nsteps = length(angles); #Number of animation steps
translations = LinRange(0, total_translation, nsteps)
Makie.record(s, "lego_walk.mp4", zip(translations, angles)) do (translation, angle)
# Rotate right arm + hand
for name in ["arm_left", "arm_right", "leg_left", "leg_right"]
rotate!(figure[name], rotation_axes[name], angle)
end
translate!(figure["torso"], translation, 0, 20)
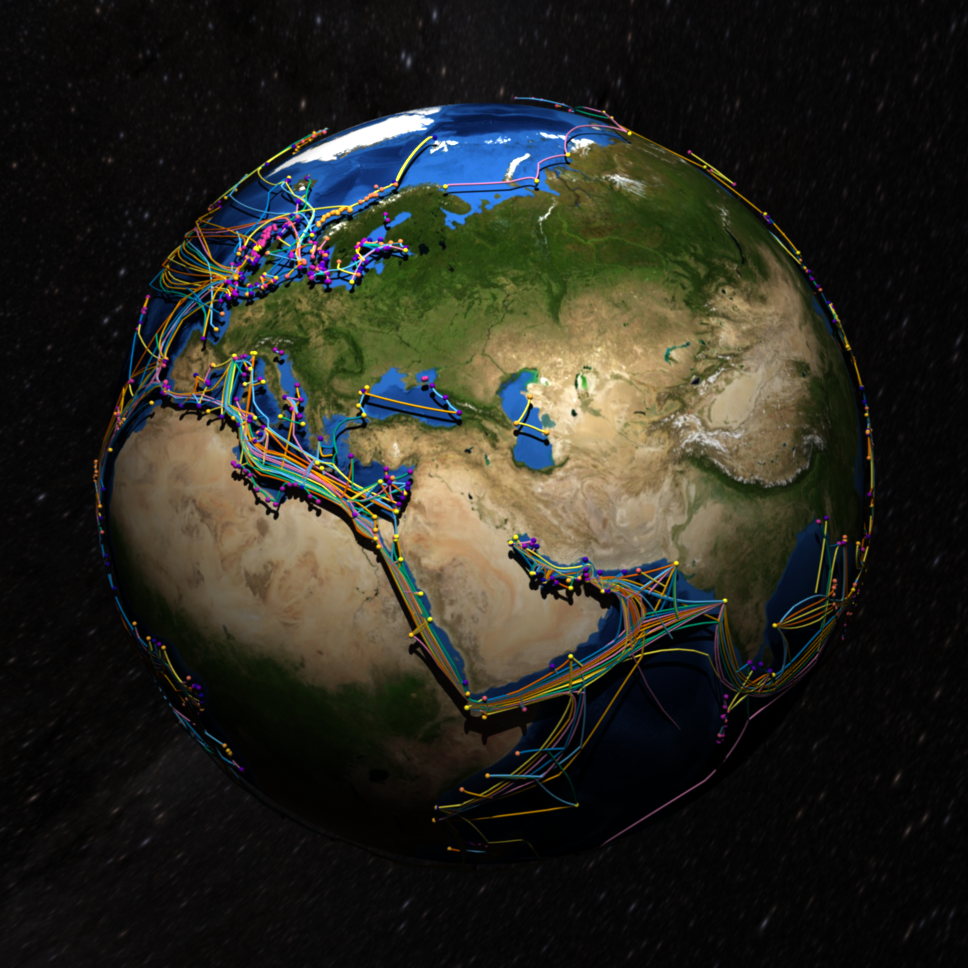
endEarth example
# by Lazaro Alonso
# taken from: https://lazarusa.github.io/BeautifulMakie/GeoPlots/submarineCables3D/
using GeoMakie, Downloads
using GeoJSON, GeoInterface
using FileIO
using RPRMakie
# data from
# https://github.com/telegeography/www.submarinecablemap.com
urlPoints = "https://raw.githubusercontent.com/telegeography/www.submarinecablemap.com/master/web/public/api/v3/landing-point/landing-point-geo.json"
urlCables = "https://raw.githubusercontent.com/telegeography/www.submarinecablemap.com/master/web/public/api/v3/cable/cable-geo.json"

landPoints = Downloads.download(urlPoints, IOBuffer())
landCables = Downloads.download(urlCables, IOBuffer())

land_geoPoints = GeoJSON.read(seekstart(landPoints))
land_geoCables = GeoJSON.read(seekstart(landCables))

toPoints = GeoMakie.geo2basic(land_geoPoints)
feat = GeoInterface.features(land_geoCables)
toLines = GeoInterface.coordinates.(GeoInterface.geometry.(feat))

# broken lines at -180 and 180... they should
# be the same line and be in the same array.

# some 3D transformations
function toCartesian(lon, lat; r = 1.02, cxyz = (0, 0, 0))
    x = cxyz[1] + r * cosd(lat) * cosd(lon)
    y = cxyz[2] + r * cosd(lat) * sind(lon)
    z = cxyz[3] + r * sind(lat)
    return (x, y, z)
end

toPoints3D = [Point3f([toCartesian(point[1], point[2])...]) for point in toPoints]

splitLines3D = []
for i in 1:length(toLines)
    for j in 1:length(toLines[i])
        ptsLines = toLines[i][j]
        tmp3D = []
        for k in 1:length(ptsLines)
            x, y = ptsLines[k]
            x, y, z = toCartesian(x, y)
            push!(tmp3D, [x, y, z])
        end
        push!(splitLines3D, Point3f.(tmp3D))
    end
end

earth_img = load(Downloads.download("https://upload.wikimedia.org/wikipedia/commons/5/56/Blue_Marble_Next_Generation_%2B_topography_%2B_bathymetry.jpg"))
# the actual plot !
RPRMakie.activate!(; iterations=100)
scene = with_theme(theme_dark()) do
    fig = Figure(; size=(1000, 1000))
    radiance = 30
    lights = [EnvironmentLight(0.5, load(RPR.assetpath("starmap_4k.tif"))),
              PointLight(Vec3f(1, 1, 3), RGBf(radiance, radiance, radiance))]
    ax = LScene(fig[1, 1]; show_axis=false, scenekw=(;lights=lights))
    n = 1024 ÷ 4 # 2048
    θ = LinRange(0, pi, n)
    φ = LinRange(-pi, pi, 2 * n)
    xe = [cos(φ) * sin(θ) for θ in θ, φ in φ]
    ye = [sin(φ) * sin(θ) for θ in θ, φ in φ]
    ze = [cos(θ) for θ in θ, φ in φ]
    surface!(ax, xe, ye, ze; color=earth_img)
    meshscatter!(toPoints3D; color=1:length(toPoints3D), markersize=0.005, colormap=:plasma)
    colors = Makie.default_palettes.color[]
    c = Iterators.cycle(colors)
    foreach(((l, c),) -> lines!(ax, l; linewidth=2, color=c), zip(splitLines3D, c))
    ax.scene.camera_controls.eyeposition[] = Vec3f(1.5)
    return ax.scene
end

save("submarine_cables.png", scene)